Category Archives: Security

PayPal schränkt nach Disput Konto ein

Ich bin seit über 16 Jahren “Kunde” bei PayPal. Nach einem Disput mit PayPal selbst hat PayPal nun plötzlich meinen Account in einen “eingeschränkten Zustand” versetzt.

Als jemand, der beruflich im Bereich IT-Sicherheit unterwegs ist, liegt mir dieses Thema natürlich gerade auch bei einem Finanzdienstleister wie PayPal sehr am Herzen. Daher benutze ich seit Einführung bei PayPal einen “Sicherheitsschlüssel” (allgemein “Zwei-Faktor-Authentifizierung”, “two-factor authentication”, 2FA, TFA, MFA genannt) als zusätzliche Sicherung meines Accounts.  (Zu diesem Thema gibt es auch einige Artikel hier in meinem Blog!) Zunächst einen Hardware-Schlüssel in Form eines kleinen feuerzeuggroßen elektronischen Geräts, später dann einen Software-Schlüssel in Form einer Handy-App.

Im Laufe der vielen Jahre der Nutzung von PayPal habe ich entsprechend oft einen neuen Sicherheitsschlüssel im PayPal-Account registriert, da ich diese Schlüssel jeweils auf meinen beiden (Privat- u. Dienst-) Handys benutze, und diese jeweils alle zwei Jahre durch neue Geräte ersetzt werden, so dass ich auch eine neue Schlüssel-App installieren und registrieren muss.

Dieser Fall war nun wieder eingetreten, und überraschenderweise konnte ich nicht mehr einen neuen Schlüssel registrieren. Der PayPal-Support teilte mir zunächst mit, diese Software-Schlüssel würden in Deutschland nicht mehr unterstützt, daher könne man keine neuen Schlüssel registrieren.

Nach längerem Hinundher fand ich jedoch heraus (u. a. durch Unterstützung von Lesern meines eigenen Blogs und eigene Untersuchungen), dass mir PayPal offensichtlich (bewusst!) die Unwahrheit gesagt hatte. Die wahre Ursache ist ein Problem auf Seiten von PayPal, nämlich eine willkürliche Beschränkung auf zehn Sicherheitsschlüssel. Man kann diese Schlüssel deaktivieren, z. B. wenn sie defekt sind oder verloren gingen, aber man kann sie nicht aus dem Account “löschen”. Erreicht man dadurch das Limit von zehn Schlüsseln, so kann man keine neuen Schlüssel registrieren.

Daher bat ich den Support, dass dieser die alten, bereits von mir deaktivierten Schlüssel löschen möge. Dazu verlangte der Support, dass ich dort anrufen möge. Warum, das wurde mir auch auf ausdrückliche Nachfrage bis heute nicht erklärt. Insbesondere hat PayPal durch meinen Anruf keine größere Gewissheit, dass es sich tatsächlich um meine Person handelt. Ich teilte PayPal mit, dass ich nach 20 min. in der Warteschleife aufgegeben habe, und dass ich ohnehin aus Beweisgründen eine Korrespondenz per Nachricht innerhalb meines PayPal-Accounts bevorzuge.

Nun hat PayPal plötzlich meinen Account in einen eingeschränkten Zustand versetzt und verlangt von mir, dass ich ein Ausweisdokument hochlade sowie ein Dokument, welches meine aktuelle Adresse belegt. Ich lehne das Hochladen meines Personalausweises grundsätzlich ab wegen der drohenden Missbrauchsgefahr (siehe der aktuelle “Mariott”-Skandal, wo Daten von 500 Mio. Kunden gestohlen wurden, u. a. Ausweisnummern!). Außerdem ist es mir unverständlich, wieso PayPal nun plötzlich — fast sieben Jahre nach meinem letzten Umzug — meine Adresse verifiziert haben möchte. Bei Umzügen habe ich bisher immer einfach meine Adresse in meinem Account geändert, damit war der Fall erledigt.

Ich kann mich PayPal gegenüber nach wie vor durch Einloggen in meinen Account authentifizieren, da ich noch über ein Handy verfüge, welches dort registriert ist. PayPal kann also keine ernsthaften Zweifel an meiner Identität haben. Sehr negativ aus Sicherheitsgesichtspunkten ist die Tatsache, dass PayPal es erlaubt, den Sicherheitsschlüssel durch die Beantwortung von zwei Fragen (“Geburtsname meiner Mutter” und “Wohnort als “Kind) zu ersetzen. Es gibt eine Reihe von Personen außer mir selbst, die diese Fragen beantworten können. Die Sicherheit meines Accounts wird also stark geschwächt, und das Verfahren des Sicherheitsschlüssels ad absurdum geführt.

Das Verhalten von PayPal — immerhin eine “Bank”, da das Unternehmen meines Wissens über nach eine Bankenlizenz verfügt! — finde ich unglaublich, geradezu “nach Gutsherrenart”. Daher werde ich mich nun bei diversen Organisationen des Verbraucherschutzes und der Finanzaufsicht über PayPal beschweren.

Exim malware scanner issue after upgrade from Jessie to Stretch

Today I finally upgraded by personal root server from Debian Jessie to Stretch, thereby upgrading Exim from 4.84 to 4.89.

After the upgrade, I observed the following errors in mainlog:

2018-05-31 08:02:03 +0000 1fOIX5-0001rg-AM malware acl condition: cmdline  : scanner returned error code: 36096
2018-05-31 08:02:03 +0000 1fOIX5-0001rg-AM H=([IPv6:2a00:6020:1efc:ee20:8857:7824:6a49:8368]) [2a00:6020:1efc:ee20:8857:7824:6a49:8368]:48523 I=[2a01:4f8:141:429::2]:465 Warning: ACL "warn" statement skipped: condition test deferred
2018-05-31 08:02:04 +0000 1fOIX5-0001rg-AM malware acl condition: cmdline  : scanner returned error code: 13
2018-05-31 08:02:04 +0000 1fOIX5-0001rg-AM H=([IPv6:2a00:6020:1efc:ee20:8857:7824:6a49:8368]) [2a00:6020:1efc:ee20:8857:7824:6a49:8368]:48523 I=[2a01:4f8:141:429::2]:465 Warning: ACL "warn" statement skipped: condition test deferred
2018-05-31 08:02:05 +0000 1fOIX5-0001rg-AM malware acl condition: cmdline  : scanner returned error code: 13
2018-05-31 08:02:05 +0000 1fOIX5-0001rg-AM H=([IPv6:2a00:6020:1efc:ee20:8857:7824:6a49:8368]) [2a00:6020:1efc:ee20:8857:7824:6a49:8368]:48523 I=[2a01:4f8:141:429::2]:465 Warning: ACL "warn" statement skipped: condition test deferred

Each of the three cmdline scanners caused an error, as shown above.

It seems there was a change in Exim from upstream, as reported by another user. Somehow it seems that if you define a cmdline scanner that uses a chain of commands, when there was an error return code encountered in the middle of the chain, the whole chain is considered failed.

To “fix” this issue (or rather work-around it), I changed the three ACL clauses as follows:

   warn  message                = This message contains malware ($malware_name)
         set acl_m0      = cmdline:\
-                               /usr/lib/AntiVir/guard/avscan -s --batch --scan-mode=all %s; /bin/echo -e \N"\navira_retval $?"\N:\
+                               /usr/local/bin/avscan_wrapper %s:\
                                \N^avira_retval 1$\N:\
                                \N^.*ALERT::[ \t]+([^;]*)[ \t]+;.*$\N
         malware                = *

I created a “wrapper” that effectively hides error return codes, and forces a return code of 0. The above wrapper looks like this:

#!/bin/bash

ARG="$1"

/usr/lib/AntiVir/guard/avscan -s --batch --scan-mode=all "${ARG}"
/bin/echo -e "\navira_retval $?"

exit 0

To make sure I didn’t break the malware scanning by my changes, I downloaded the EICAR test virus and sent it to myself. Exim caught the “virus” and ditched it.

Get certificates for “internal” hosts from Let’s Encrypt

I have a pretty large internal IT “landscape” in my house, and as an IT pro I want everything to be clean and “safe.” So even internally I’m using official SSL (or I should say “TLS”, as SSL 2.0 or 3.0 is deprecated since many years…) certificates for my router, WiFi access points, NAS devices, intranet server, etc., using host names in my own domain. I host this domain DNS-wise myself on a root server I rent from Hetzner.

Before the StartSSL disaster I got my certs from them. Afterwards I switched to WOSign, but now that they had their scandal as well, what to do?!

Well, Let’s Encrypt, a free public CA, is something I’m using anyway for my root server since they started operating. But to verify ownership of a domain name you had to run a web server on that respective host — something I can’t easily do for my internal hosts, as they have private IP addresses only, and their host names are not even publicly visible (they don’t have  a public A record, only one visible in my internal LAN). Even for my router’s externally visible host name I can’t easily use an HTTP-based challenge, as for security reasons I don’t want to operate a web server there.

By chance I came across the dns challenge that is now available in Let’s Encrypt’s certbot. This challenge works by deploying a TXT record that certbot requests to be under this domain name. Once you did this, you tell Let’s Encrypt to check, and if they find the TXT record this proves that you have authority over the domain.

Using it is quite straight forward:

# certbot certonly --manual -d hostname.internal.bergs.biz --preferred-challenges "dns"
[...]
Please deploy a DNS TXT record under the name
_acme-challenge.hostname.internal.bergs.biz with the following value:

YrAE-fmu-Zjsdhsjhd328723hjdhjcjHJJHJhds

Once this is deployed,
-------------------------------------------------------------------------------
Press Enter to Continue

A few seconds later I had successfully received my certificate.

So now I will write a script that will run periodically on my intranet server, and that will retrieve the then-current certificates for my internal hosts from my root server, and deploy them internally.

Monitoring Microsoft SNDS Status

If you operate a mail server, you should be aware of its “reputation,” because a bad reputation can give you issues sending email to certain recipients.

Microsoft operate a set of services called “Smart Network Data Services (SNDS)” to protect their own email services. If they see spam or other “malicious” activity from your address space, they might put you on a blacklist, and based on that reject email from you. It is easy to register yourself so that you can query the status of your IP address space. Just visit the above site and get started.

I created a quick’n’dirty monitoring script for Nagios to monitor the status of my IP address space in SNDS. Whenever there is data for one of my IP addresses, this script will return a WARNING status, so that I can look into it.

The script looks like follows:

#!/bin/bash

URL='https://postmaster.live.com/snds/ipStatus.aspx?key=12345678-1234-1234-1234-0123456789ab'

content="$(curl -s $URL)"
size=${#content}

if [ $size -gt 0 ]; then
    echo "WARNING:SNDS status seems to be UNHEALTHY"
    exit 1
fi

echo "OK:SNDS status is OK"
exit 0

You also need command and service definitions in Nagios as follows:

define command{
        command_name    check_snds
        command_line    /usr/local/lib/nagios/plugins/check_snds
}

define service {
        host_name                       my_host
        service_description             SNDS
        check_command                   check_snds
        use                             generic-service-internal
        notification_interval           0 ; set > 0 if you want to be renotified
}

Now, Nagios will monitor the “reputation” of your address space for you.

Bitlocker: How to require Startup PIN

A lot of people use Bitlocker for full-disk encryption of their hard drives. For extra security you might want to be prompted for a PIN when you unlock your hard drive, because allowing attackers to boot your system without authentication might open up extra attack vectors. Setting a PIN can be easily accomplised if you know how… 🙂

The below instructions are exact for Windows 10, but they are very similar in Windows 7, too.

Launch the Local Group Policy Editor by typing gpedit.msc into your Windows search, then when it has been found right-click on it and select Run as administrator from the pop-up menu. Then maneuver to the following path in the left “folder” pane:

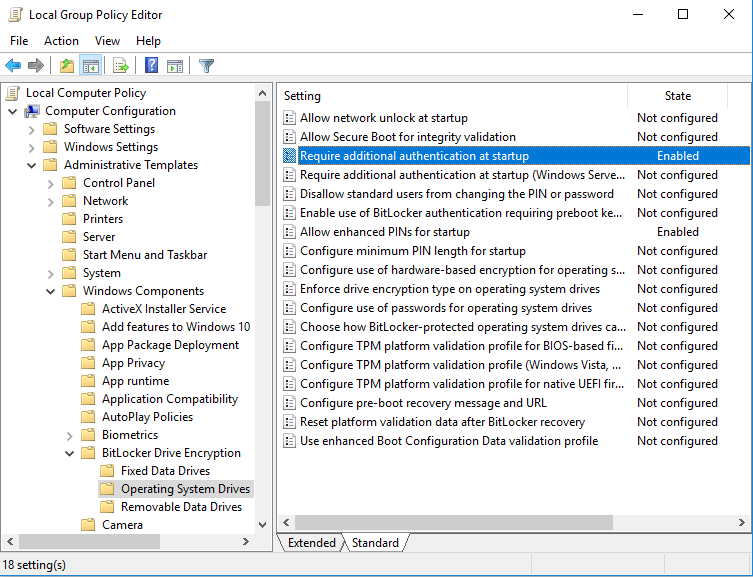
Local Computer Policy > Computer Configuration > Administrative Templates > Windows Components > Bitlocker Drive Encryption > Operating System Drives.

This is what it looks like if you did it correctly:

Bitlocker_Group_PolicyThen double-click on the setting Require additional authentication at startup, and you see the following dialog:

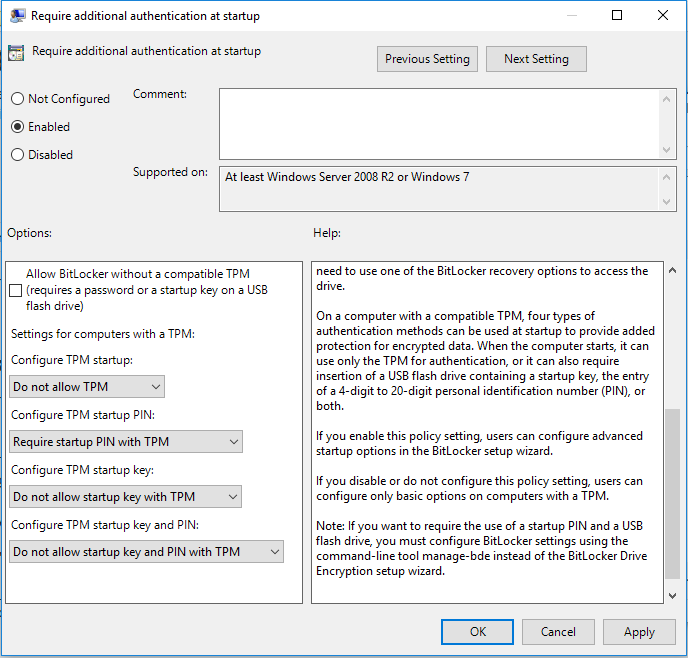
Bitlocker_PINNow change option Configure TPM startup PIN to read:

Require startup PIN with TPM

Then reboot. Now you can right-click on your system drive and select Set Bitlocker PIN or Change Bitlocker PIN (I forgot to take a screenshot of this last step, so I’m not 100% how exactly this looked like, but it should be obvious) from the pop-up menu.

You’re done. Wasn’t that easy?

Please leave a message if this was helpful.

Attention changing BIOS Settings with Bitlocker

The Problem

If your laptop has been set up to use Bitlocker, by your company or yourself, you should be very cautious when playing with your BIOS settings.

Bitlocker considers BIOS settings changes a potential security breach, as somebody could e. g. change boot order to boot from an external media to try to fiddle with the boot mechanism set up on your hard drive or SSD. This is why when you change something in the BIOS or just boot from an external drive, such as a thumb stick, Bitlocker will prompt you for your recovery code.

The Solution

To prevent this you just have to disable the so-called “protector” for your boot drive. Only then should you change BIOS settings or boot from a drive other than your normal boot drive.

You do so using the manage-bde tool which is part of Windows:

manage-bde –protectors –disable <Drive>

Don’t forget to re-enable the protector after you’re done:

manage-bde –protectors –enable <Drive>

If this helped, I’d appreciate a comment from you here on my blog.

Avira can’t get their DNS Setup right

Since many months I’m seeing the following issue with Avira‘s DNS setup, and I’m thinking it’s extremely embarassing for a company working in IT Security not to even get the basics right… 🙁

This is what I’m seeing:

named[2597]: DNS format error from 89.146.248.46#53 resolving dl4.pro.antivir.de/AAAA for client 127.0.0.1#52127: Name avira-update.net (SOA) not subdomain of zone antivir.de -- invalid response

So what does that mean?

Let’s have a look at which nameservers Avira are using anyway:

$ dig -t ns antivir.de

;; ANSWER SECTION:
antivir.de.        3600    IN    NS    ns13.avira-ns.net.
antivir.de.        3600    IN    NS    ns10.avira-ns.de.
antivir.de.        3600    IN    NS    ns9.avira-ns.net.
antivir.de.        3600    IN    NS    ns12.avira-ns.de.
antivir.de.        3600    IN    NS    ns14.avira-ns.de.

;; ADDITIONAL SECTION:
ns10.avira-ns.de.    86400    IN    A    80.190.154.111
ns12.avira-ns.de.    86400    IN    A    89.146.248.46
ns14.avira-ns.de.    86400    IN    A    74.208.254.45

Ok, so 89.146.248.46 in the error message quoted above is indeed one of the nameservers for domain antivir.de.

So let’s look up the IPv6 address record (AAAA) for dl4.pro.antivir.de on the given nameserver:
$ dig @89.146.248.46 -t AAAA dl4.pro.antivir.de

;; AUTHORITY SECTION:
avira-update.net. 3600 IN SOA ns1.avira-ns.net. domains.avira.com. 2015010301 10800 3600 2419200 3600

WTF?!

Why are they returning a domain name that is not a subdomain of the original domain?! That’s an error.

And it’s especially embarassing as this is the update URL for Avira’s AntiVir product. Again remember we’re talking about a security firm here!

Remove sensitive files from Synology debug.dat

Sometimes Synology support ask that you support a debug log. This can be done by launching the Support Center application. Then go to Support Services > Log Generation > push button “Generate logs”.

If you are concerned that you might give them sensitive information you can clean up the debug.dat file and remove the sensitive files from it.

I wrote a quick shell script that should runs under Mac OS X, but should also run under Linux. Here it is:

#!/bin/bash

DEBUG_FILE="$1"
NEW_FILE="$2"
if [ -z "${DEBUG_FILE}" -o -z "${NEW_FILE}" ]; then
    echo "You must specify the path to the debug AND to the new file, quitting..."
    exit 1
fi

if [ -z "$TMPDIR" ]; then
    TMPDIR="/var/tmp"
fi

PROG="`basename $0`"

if [ ! -r "${DEBUG_FILE}" ]; then
    echo "Debug file ${DEBUG_FILE} is unreadable, quitting..."
    exit 1
fi

if [ -f "${NEW_FILE}" ]; then
    echo "New file ${NEW_FILE} already exists, quitting..."
    exit 1
fi

EXCLUDE_PAT="`mktemp -t ${PROG}`" || exit 1

cat >"${EXCLUDE_PAT}" <<EOF
volume1/@tmp/SupportFormAttach28229/dsm/etc/application_key.conf
volume1/@tmp/SupportFormAttach28229/dsm/etc/shadow*
volume1/@tmp/SupportFormAttach28229/dsm/etc/ssl/*
EOF

tar cfz "${NEW_FILE}" -X "${EXCLUDE_PAT}" @"${DEBUG_FILE}"

rm -f ${EXCLUDE_PAT}

If this is helpful for anybody, please let me know by commenting on this article.

ESTsoft leaked personal information

It seems ESTsoft leaked personal information. How can I tell? Well, continue reading…

Yesterday I received spam on a unique e-mail address I only ever used to communicate with ESTsoft, makers of ALzip.

So they either had a security incident where customer data was stolen, or they deliberately passed (possibly “sold”) my e-mail address to a third party.

I tried to contact them, but eventually they’re no longer in business because their support e-mail address does no longer exist. See below non-delivery notice:

Delivery has failed to these recipients or groups:
support@estsoft.com
The email address you entered couldn’t be found.


Is there anyone out there who have similar experience with that company? If so, I’d like to hear from you…

Outlook.com breaks DKIM signatures

I’m currently implementing DKIM support for my Exim mail server, and due to this I’m sending a lot of test messages to all major freemail providers in Europe and the USA.

I noticed that Outlook.com breaks DKIM signatures since they modify one header as follows:

The original header I sent is

Content-Type: text/plain; charset=ISO-8859-1; format=flowed

while the header which I see when I fetch the received message with IMAP is the following:

Content-Type: text/plain; charset="ISO-8859-1"; format=flowed

Noe the extra “double quotes” around the charset which are not transparent to “relaxed” Header Canonicalization. This causes Thunderbird’s “DKIM Verifier” extension to fail on this message.

What’s strange is that Outlook itself succeeds internally to verify the DKIM signature, so the modification to said header probably occurs after checking the original header. See below for what the header of the received message says about authentication:

Authentication-Results: ... dkim=pass (identity alignment result is pass and alignment mode is strict) header.d=example.org;

To solve this small issue I modified Exim’s list of headers to be signed as follows. Original set is

Content-Transfer-Encoding:Content-Type:Subject:To:MIME-Version:From:Date:Message-ID

while I now only sign the following (which I consider to be sufficient):

Subject:To:From:Date:Message-ID

Let me know if you have any comments or suggestions.