Category Archives: Storage

A deep-dive into UEFI Booting

[According to my own standards, this post about “UEFI booting” was only like 70% “ready” — I had it pending in “draft” state for many months, because I was lacking the time to finish it… I now decided to release it in its current state, simply because I believe it will still be very useful to many people interested in the topic…]

Before we actually dive deep into how UEFI booting works, a short and simple introduction is due.

Introduction

What is UEFI, anyway?

UEFI could be called the successor of the old BIOS concept. It is a unified version and successor of “EFI”, which was an architecture for a platform firmware used to boot operating systems (in the following abbreviated as “OS”), and the corresponding interface to interact with the firmware and the operating system.

The advantages of UEFI over the traditional BIOS are, among others, the following:

  • Boot disks with large partitions (over 2 TB), using GUID partitioning (GPT),
  • network capabilities already in pre-OS phase, and
  • modular design.

Boot Mechanism

So, how does booting with UEFI work?

When you enter your UEFI, you will find a user interface that shows all devices that have been detected, and that support booting. Usually that includes all your hard drives.

You can freely define a desired boot order (regardless of hardware paths, i.e. the way your drives are connected, be it via an SATA port, be it via an NVME slot), i. e. the primary OS that should be booted, if that fails the next OS that should be tried, etc. That’s called your “boot configuration”, and it resides in your motherboard’s NVRAM. (a concept that’s basically the successor of what used to be called “CMOS” in the old days of the BIOS). More specifically, we speak about “UEFI Variables“, which allow the OS and the firmware to interact.

When UEFI’s Firmware Boot Manager wants to boot an OS, it first needs to load something called the OS “Boot Manager.” Common OS boot managers are:

  • BOOTMGFW.EFI used to load Windows, or
  • SHIMX64.EFI used to load Linux

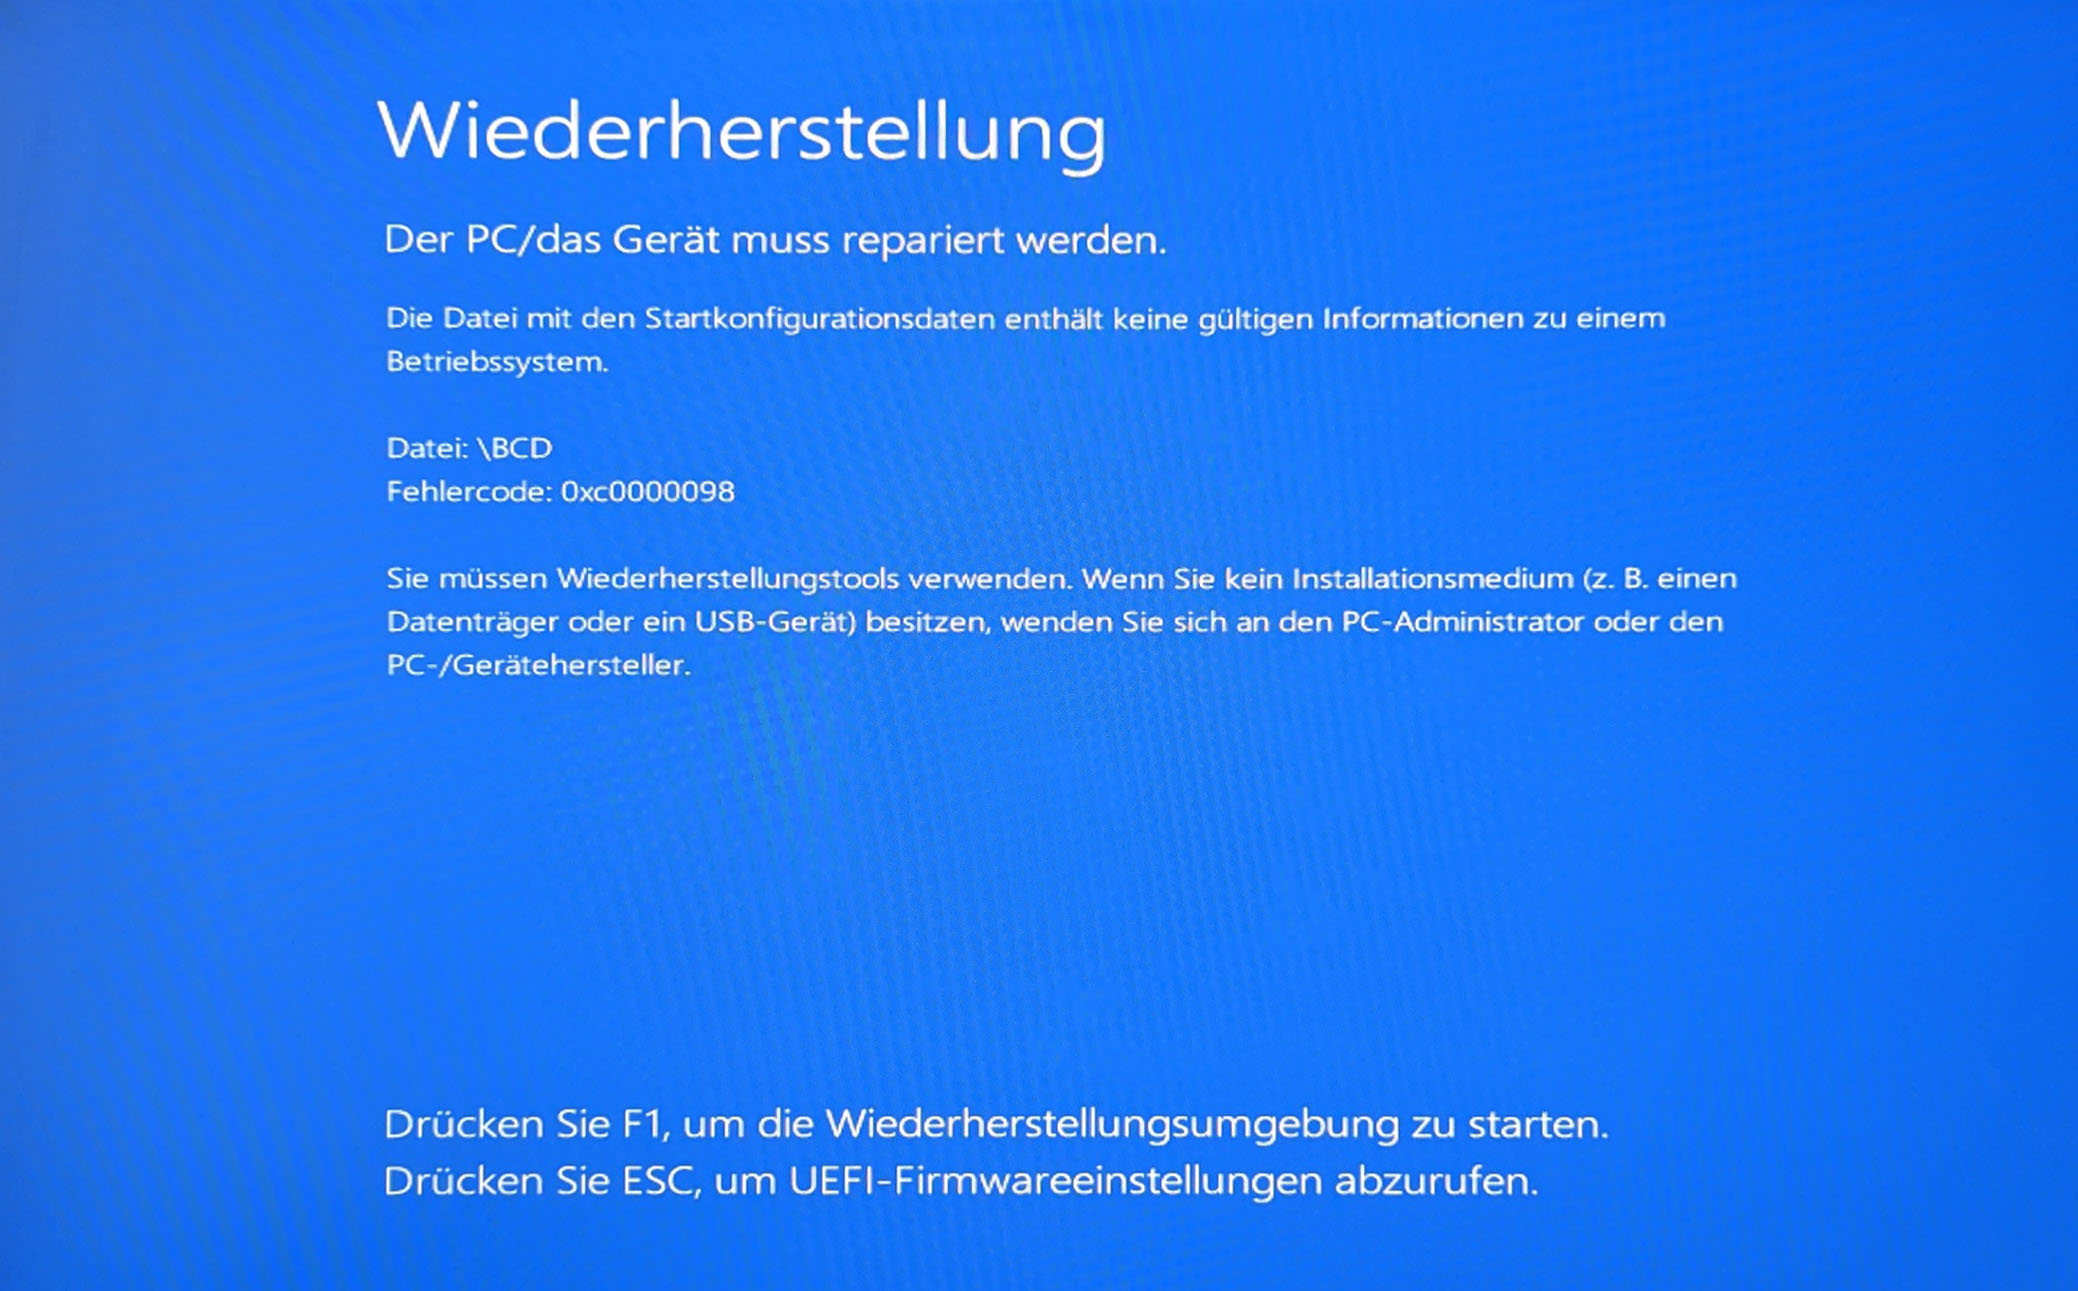
The OS boot manager is located on the “EFI system partition” (ESP). This is a small partition (usually only a few 100 M) at the start of your hard drive, formatted with basically a FAT filesystem. FAT is a very simple filesystem, so that the code to parse it and load files from it can be reasonably small and fit into a boot firmware.

A typical disk layout for a Windows installation may look as follows:

UEFI /EFI System Partition as seen under Windows

The first partition is the ESP, then comes the Windows boot and system drive (with a drive letter of C:), and then comes the recovery partition.

Apart from boot loaders, the ESP can contain kernel images or (device) drivers, e. g. to support hardware that must be initialized prior to the start of the OS, or to give access to a complex filesystem that holds the actual OS to be booted.

Depending on which OS you want to boot, the OS boot manager then loads

  • in the case of Linux: the OS kernel, and the kernel in turn loads the OS, or
  • in the case of Windows: the Windows Boot Loader (\Windows\system32\winload.efi)

Boot Configuration Details

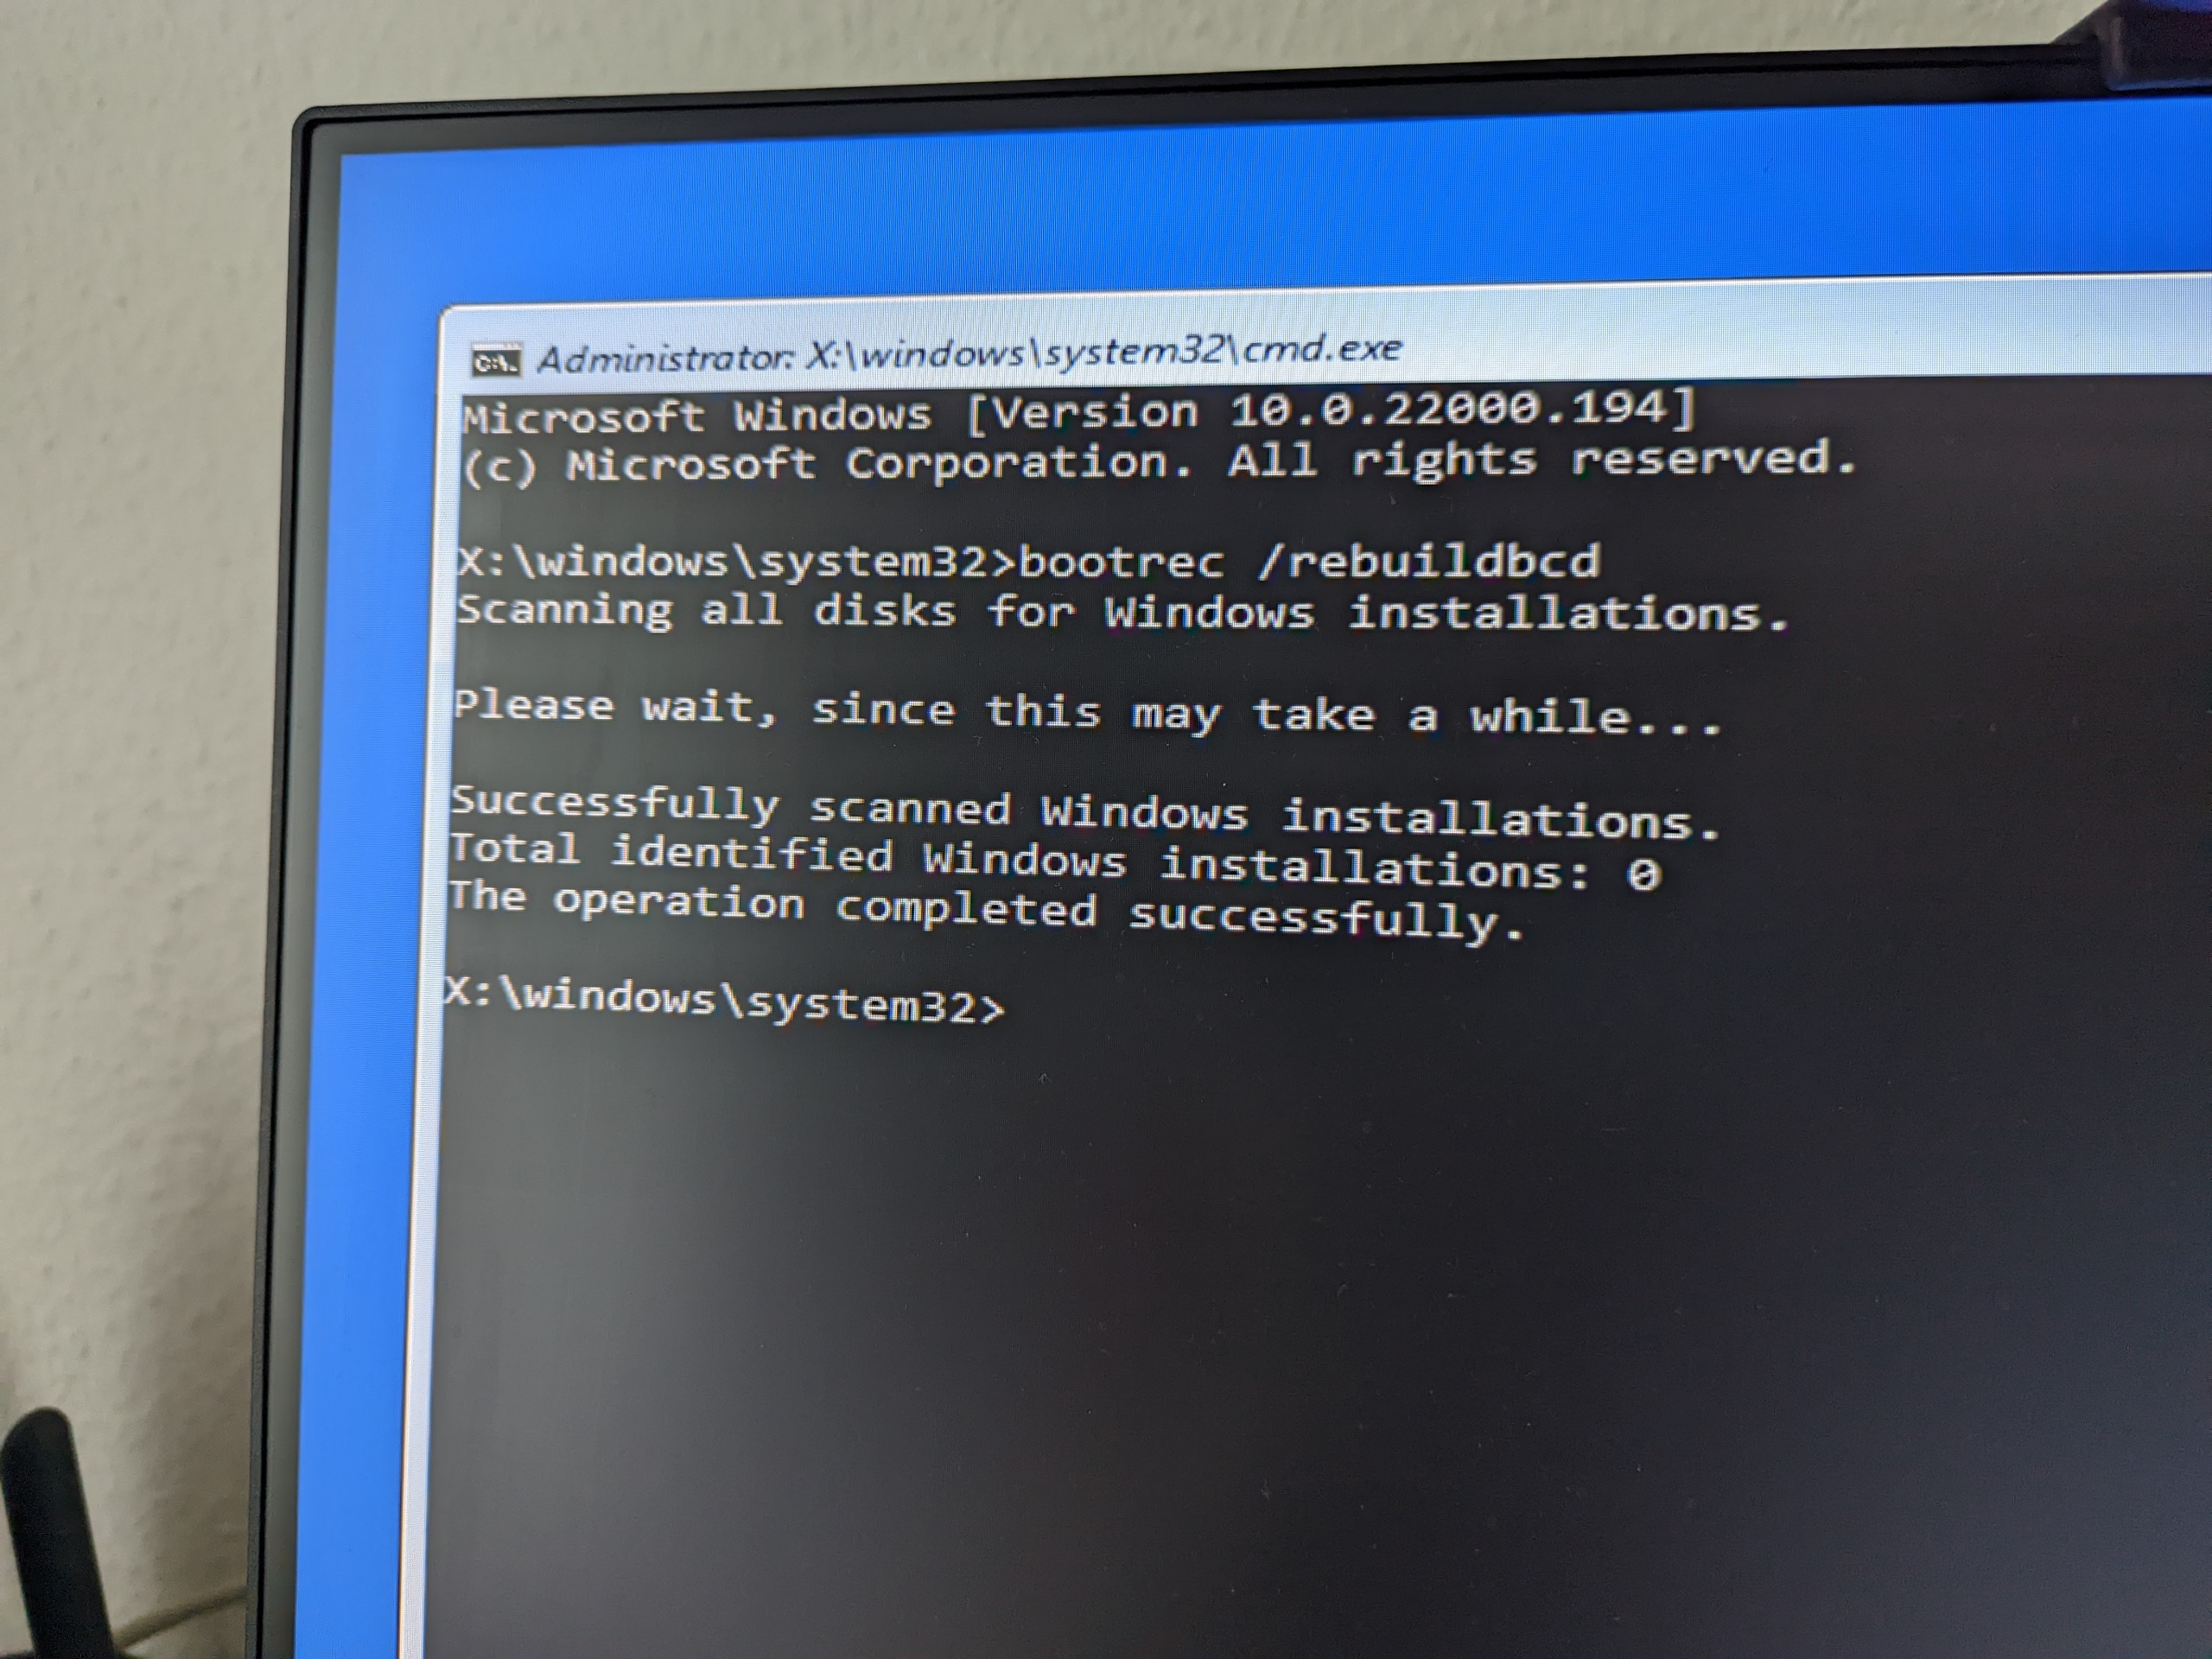
Now that we got a good overview of the mechanism as a whole, let’s dive into the details. Let’s look at the boot configuration of my machine. To do so, invoke the below command (I did it under Ubuntu 23.04, but it should work the same under any reasonably current Linux distro where the tool is installed):

# efibootmgr -v
BootCurrent: 0003
Timeout: 1 seconds
BootOrder: 0000,0002,0003
Boot0000* Windows Boot Manager    HD(1,GPT,a39d5736-7aaf-4be0-b6b6-0852ba2f7803,0x800,0x32000)/File(\EFI\MICROSOFT\BOOT\BOOTMGFW.EFI)WINDOWS………x…B.C.D.O.B.J.E.C.T.=.{.9.d.e.a.8.6.2.c.-.5.c.d.d.-.4.e.7.0.-.a.c.c.1.-.f.3.2.b.3.4.4.d.4.7.9.5.}…R…………….
Boot0002* ubuntu    HD(1,GPT,280ea55d-c182-5242-bb52-a2b40812190c,0x800,0x219800)/File(\EFI\UBUNTU\SHIMX64.EFI)..BO
Boot0003* ubuntu    HD(1,GPT,91b56f9f-3526-404b-b681-1c684551ec4f,0x800,0xd87be)/File(\EFI\UBUNTU\SHIMX64.EFI)..BO

So, what does the above tell us? First, we see that “(Boot)0003” is the boot entry used to start the currently running system. Secondly, the order in which boot is tried is 0000, 0002, and then 0003. So by default, Windows (by the “Windows Boot Manager”) will be booted. Then we see the three boot entries. The star/asterisk (*) after the boot entry shows that all these entries are “active.”

What about the remaining info in the above command output? Immediately after the boot entry, we see the names that are also displayed on screen by the Firmware Boot Manager (“Windows Boot Manager” and two times “ubuntu”). We then see references to the ESPs used to boot these OS.

HD obviously means “hard drive”, then we see a 1 which refers to the first partition on the respective drive, then we see GPT which refers to the partitioning table format, and then we see a UUID. To find the respective partitions, we can use the below command:

# blkid --match-token TYPE=vfat
/dev/nvme0n1p1: LABEL="UBUNTU_TEMP" UUID="EC76-8E7F" BLOCK_SIZE="512" TYPE="vfat" PARTUUID="280ea55d-c182-5242-bb52-a2b40812190c"
/dev/nvme1n1p1: SEC_TYPE="msdos" LABEL_FATBOOT="UBUNTU_MAIN" LABEL="UBUNTU_MAIN" UUID="8140-E4C0" BLOCK_SIZE="512" TYPE="vfat" PARTLABEL="EFI" PARTUUID="91b56f9f-3526-404b-b681-1c684551ec4f"
/dev/sda1: UUID="40AD-1127" BLOCK_SIZE="512" TYPE="vfat" PARTUUID="a39d5736-7aaf-4be0-b6b6-0852ba2f7803"

The PARTUUID values in the above output match the UUIDs in the boot configuration as shown by efibootmgr. So, the ESPs are located by searching for the partitions’ UUIDs. That means that you can replug your drives to different ports, or even copy partitions to different drives, and the UEFI boot mechanism will still find them. That’s a nice and very stable design.

UEFI User Interface

Now, let’s enter the UEFI and look at some of the details there. My PC’s motherboard is an MSI, and to enter the UEFI I need to press “F2” after the beep when powering on the PC (from “off” state, not when suspended to RAM, i.e. “sleeping”!) or restarting it.

# lspci
[...]
21:00.0 Non-Volatile memory controller: Sandisk Corp WD Blue SN570 NVMe SSD 1TB
2b:00.0 Non-Volatile memory controller: Sandisk Corp WD Blue SN570 NVMe SSD 1TB

How to manually rebuild your Windows BCD Store

I recently had a mishap where on a system that I had just upgraded from Windows 10 to Windows 11 the Windows BCD Store (Boot Configuration Data Store) was suddenly messed up, presumably by a patch update I had taken earlier:

Blue screen showing “Wiederherstellung: Der PC muss repariert werden.” (German for: “Recovery: The PC must be repaired.”), hinting to a problem with the Windows BCD Store.

Many people will recommend in that situation to boot to a Windows Recovery Environment (RE) and execute the following:

>bootrec /rebuildbcd

But what if the scan for all Windows installation turns out not to identify yours?! Like in the below photo?

Photo of a Windows RE session, failing to automatically rebuild the Windows BCD Store

Are you SOL then?

Don’t despair.

The solution is actually quite simple. Other than the above which is supposed to be fully automatic, it involves some manual tasks, but it should be quite easy if you are at least a bit tech-savvy.

Continue reading How to manually rebuild your Windows BCD Store

Hard drive slot does not matter in Synology

You can read all over the internet that it’s important to put your hard drives into their original slots, e. g. when you migrate to a new Synology device, or when you need to remove the drives to add memory.

This is simply not true.

As expected DSM, which is a flavor of “Linux,” will automatically discover your physical partitions based on the GUIDs each partition has, and then reassemble your volumes. I just tested this (i. e. intentionally put the drives into the device in the wrong order) with a JBOD volume, and I had no issues whatsoever. I cannot see why this should be different with SHR or RAID-5, for example.

If you have also tested this, please let me know how it went for you.

Securely erase Drives on Synology NAS

I had to erase an external hard drive, a WD My Book, because I had to return it due to defects. So I searched on the web how to do that on a Synology DS916+ NAS, but I could not easily find the solution. Therefore I did a more generic search how to do it under Linux, and came across the tool “shred” which I had used years ago for the last time.

I checked on my NAS, and the tool was readily available. So I ran the following command to securely erase the (external) hard drive:

 shred /dev/sdq1

Hope this helps people who need to accomplish the same.

Nie wieder Synology!

Ich muss mir heute mal meinen Frust über die schlechte Qualität der Synology-Disk Station Manager (DSM)-Software vom Leib schreiben.

Seit ich Synology-Produkte einsetze — immerhin seit mehr als fünfeinhalb Jahren (DS212+, DS414, DS415+, DS916+, wir reden hier über insgesamt mehr als 1.800 EUR, die nur die “nackten” Geräte gekostet haben!) — ärgere ich mich immer wieder über geradezu stümperhafte Implementierungen von bestimmten Funktionen. Und was dem Ganzen dann die Krone aufsetzt ist der geradezu unverschämt reagierende Synology-Support, der Bugs einfach nicht als Bugs akzeptiert, sondern “gerne in meinem Namen einen Change Request einreicht, aber ob und wann der implementiert wird können wir nicht sagen”. Oder teilweise geradezu dämliche Workarounds als “Lösung” vorschlägt, statt das Problem richtig zu lösen. 🙁

Damit wir uns nicht falsch verstehen: Die absoluten Grundfunktionen (Dateiserver über SMB, CIFS, AFP) funktionieren selbstredend problemlos. Aber dabei ist ja auch nichts falsch zu machen. Synology übernimmt einfach die bekannten und bewährten Open Source-Dienste, wie z. B. Samba. Aber bei fast allem anderen, was Synology “oben drauf gesetzt” hat, gibt es Probleme. Die unten beispielhaft geschilderten Probleme lassen sich allesamt im Netz wieder finden. Unzählige Kunden leider unter diesen Problemen, aber Synology lässt ihre Kunden “im Regen stehen”!

Einige Beispiele von Problemen der letzten Jahre, die ich gegenüber Synology reklamiert habe, die aber bis heute nicht beseitigt sind: Continue reading Nie wieder Synology!

Migrating from Synology DS415+ to DS916+

Today I migrated from a Synology DS415+ (upgraded to 8 GB myself) to a brand-new, unused Synology DS916+ (8 GB factory equipped.)

I followed the instructions given by Synology, but as my actual experience was considerably different (actually easier!) from what supposedly should have happened, I’m documenting them here for reference.

I started by upgrading the old unit to the latest DSM version, and then shutting it down. I moved all four hard drives to the new unit, making sure the same order of the drives in the drive bays was maintained.

I then switched on the new unit and launched the web UI in a browser. This is what I got:

synology-migration-01 Continue reading Migrating from Synology DS415+ to DS916+

Synology refuses to admit annoying “Cloud Sync” Bug

Since about half a year I’m struggling with a very annoying bug in Synology’s “Cloud Sync” package I’m running on my expensive Synology DiskStation DS415+ NAS. It is still present as of today’s DSM 6.0.2-8451 Update 2.

I would like to backup my photos to my Amazon Drive/CloudDrive. As an Amazon Prime customer I can store an unlimited number of images, and only images — other files, like *.xmp sidecar files, will count against my general 5 GB limit.

The problem is that Synology’s Cloud Sync will upload the sidecar files, even though I explicitly only select “Images” to be backed up (and *.xmp is not part of Images, as I will show you!). Continue reading Synology refuses to admit annoying “Cloud Sync” Bug

Remove sensitive files from Synology debug.dat

Sometimes Synology support ask that you support a debug log. This can be done by launching the Support Center application. Then go to Support Services > Log Generation > push button “Generate logs”.

If you are concerned that you might give them sensitive information you can clean up the debug.dat file and remove the sensitive files from it.

I wrote a quick shell script that should runs under Mac OS X, but should also run under Linux. Here it is:

#!/bin/bash

DEBUG_FILE="$1"
NEW_FILE="$2"
if [ -z "${DEBUG_FILE}" -o -z "${NEW_FILE}" ]; then
    echo "You must specify the path to the debug AND to the new file, quitting..."
    exit 1
fi

if [ -z "$TMPDIR" ]; then
    TMPDIR="/var/tmp"
fi

PROG="`basename $0`"

if [ ! -r "${DEBUG_FILE}" ]; then
    echo "Debug file ${DEBUG_FILE} is unreadable, quitting..."
    exit 1
fi

if [ -f "${NEW_FILE}" ]; then
    echo "New file ${NEW_FILE} already exists, quitting..."
    exit 1
fi

EXCLUDE_PAT="`mktemp -t ${PROG}`" || exit 1

cat >"${EXCLUDE_PAT}" <<EOF
volume1/@tmp/SupportFormAttach28229/dsm/etc/application_key.conf
volume1/@tmp/SupportFormAttach28229/dsm/etc/shadow*
volume1/@tmp/SupportFormAttach28229/dsm/etc/ssl/*
EOF

tar cfz "${NEW_FILE}" -X "${EXCLUDE_PAT}" @"${DEBUG_FILE}"

rm -f ${EXCLUDE_PAT}

If this is helpful for anybody, please let me know by commenting on this article.

Terratec Cinergy Hybrid XE not working on Synology

Even on the latest 5.1-5021 version of Synology‘s DSM I couldn’t get my Terratec Cinergy Hybrid XE working on my Synology NAS — the corresponding kernel module tm6000 would always generate a general protection fault on my DS414.

Today I upgraded to a DS415+ (with a completely different CPU), and the module still crashes.

So it seems it’s a real bug in the driver, not just a defect on a single platform (which can happen e. g. due to compiler bugs).

Update 2015-06-19:

Unfortunately Synology seem not very interested in this kind of problems. I repeatedly reported this issue, but all they replied is “Thanks for your report, we’re looking into this.” Even in the latest DSM release 5.2 the issue is still present.

MSI Mega Sky 580 DVB-T Stick Support dropped by Synology

MSI Mega Sky 580 DVB-T stick users beware:

With DSM 5.0-4493 Update 4 for my DS414 Synology suddenly deliberately disabled support for my MSI Mega Sky 580 DVB-T stick.

I did not immediately notice this, since Synology do not warn you that you device has been disabled. So I missed a couple of programmes I wanted to record for my kid — thank you so much, Synology! 🙁

I downgraded to DSM 5.0-4493 and then installed Update 3 again, and my stick is still working.

Let’s see how Synology react to my complaint. If they will not enable my stick again I will complain to Amazon where I bought the device from — let’s see how they will respond…