Category Archives: Cell Phones

Bedeutet neues Handy auch neue Telefonnummer?

Mein Vater benötigt ein neues Handy, da sein altes — welches prinzipiell noch sehr neuwertig ist — leider seit mehr als einem Jahr keine Sicherheitsupdates mehr erhält. Ein Weiternutzen ist daher keine Option, da er es auch u. a. für Online-Banking benutzt. Ich habe ihm also ein Google Pixel 6a bestellt — ein wirklich sehr leistungsfähiges Handy mit moderatem Preis (“Black Friday” lässt grüßen!) und fünf Jahren Updates direkt von Google.

Im Zuge des Austauschs überraschte er mich plötzlich mit einer (für mich als Experten) sehr “merkwürdigen” Frage: “Kriege ich denn dann auch eine neue Handynummer?”

Hinterher wurde mir klar, dass wahrscheinlich vielen, gerade älteren Menschen (die nicht häufig ihren Anbieter oder ihren Handytarif wechseln) nicht ganz klar ist, wo denn eigentlich die Nummer “sitzt”. Ich möchte das Ganze hier also einmal mit sehr einfachen Worten erklären, vielleicht hilft das ja dem einen oder anderen…

Jedes Handy benötigt eine SIM. “Früher” war das immer ein Chip, ein elektronisches Modul, anfangs so groß wie eine Kreditkarte, später immer kleiner, bis es “zuletzt” nicht mal mehr die Größe eines halben Daumennagels hatte. Mittlerweile gibt es die SIM auch in “virtueller” Form, man kann sie per Internet in das Handy hineinladen (“eSIM” genannt).

Was aber ist eigentlich der Zweck der SIM? “Früher” hat man dort sein Adressbuch gespeichert, auch eine gewisse Anzahl an SMS-Nachrichten konnte dort gespeichert werden. “Heutzutage” werden die Kontakte und Kurznachrichten üblicherweise direkt im Handy gespeichert. Aber wofür wird die SIM denn immer noch benötigt?

Continue reading Bedeutet neues Handy auch neue Telefonnummer?

Grundlagen der Android-Bedienung

Heute möchte ich einmal die Grundlagen der Android-Bedienung erläutern sowie die wichtigsten Bezeichnungen für die Bedienelemente. Ich beziehe mich hier auf ein “nacktes” Android 11, wie es von Google ausgeliefert wird, z. B. für die Pixel-Handys oder Handys von anderen Herstellern, die Teil der Android One-Reihe sind. Bei Geräten mit Android 10 sieht das aber alles sehr ähnlich aus.

Sie können diese Details auch bei Google nachlesen, dort sind diese jedoch nicht so schön illustriert wie hier.

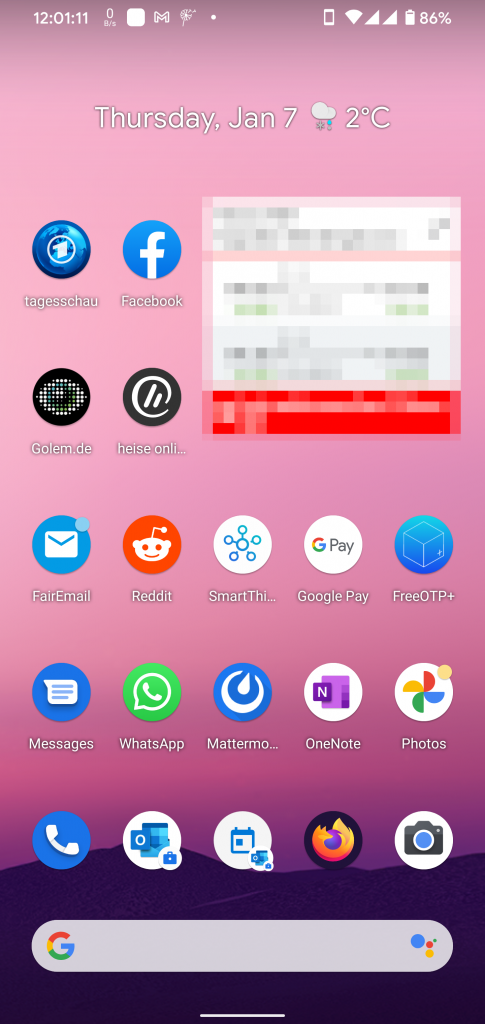
Wenn keine App geöffnet ist, dann befindet man sich auf dem Startbildschirm (“Home Screen“). Dieser sieht in etwa so aus:

Startbildschirm

Die Icons (korrekterweise “Verknüpfungen” genannt, im Englischen “Shortcut“)), die man dort sieht, hat entweder der Benutzer selbst “von Hand” hinzugefügt (s. u.), oder sie werden (je nach Einstellung) bei Installation einer neuen App vom System automatisch hinzugefügt.

Durch horizontales Wischen nach links oder rechts kann man zwischen verschiedenen Startbildschirmen — so vorhanden — umschalten.

Continue reading Grundlagen der Android-Bedienung

Flashing Android Firmware Builds using Android Flash Tool

As a long-time Android user (since the days of Android 2.0, if I remember correctly), I have seen many things already, especially as I was involved in the development of mobile phones, and also fiddled a lot with CyanogenMod, LineageOS, and other custom ROMs. Still, I recently discovered something new for myself, and this is something I really find spectacular. It’s a new mechanism to flash Android firmware builds, and it’s called “Android Flash Tool” (AFT).

Let me elaborate…

Usually, to reflash a device you need to install a program on your workstation, like a vendor flashing tool, or the Android Debug Bridge (adb) command-line tool. With the Android Flash Tool, this is no longer required. The only thing you need is your WebUSB-capable (browser). 🙂 Currently, only Chrome or Edge support it. (Firefox currently doesn’t support it due to security concerns.)

Also, the number of devices which support the AFT is very, very limited. Basically, it’s just the Google Pixel series of phones, plus a few development boards.

But if you have one of those devices, it’s pretty cool.

Continue reading Flashing Android Firmware Builds using Android Flash Tool

Google Fi Activation fails with Error Code B050

If you get an error code of “B050” when trying to activate your “Google Fi” service, it is because you are identified as not being in the US right now. This was confirmed to my by Google Support on the phone a few minutes ago.

Whether this is being identified by your IP address or your phone’s location, I can’t tell (yet). Could be that I bring up a VPN to check… 😉

2020-02-19 Update: I was just too curious, so only a day later I quickly wrapped up a VPN with a source IP from the US (thanks, AWS! :-)). And, presto, I could activate Google Fi. So it is crystal clear that they identify you by your IP address.

I could make calls via VoWiFi, but when I disabled WiFi I couldn’t attach to the mobile network. This is probably because I’ve never joined my “home (mobile) network” yet. I’ll be in Florida soon, then I will join the mobile network there. And I’m sure when I return to Germany I’ll be able to join German mobile networks as well…

Xiaomi Mi A2 Testbericht

Einleitung

Heute möchte ich kurz das Xiaomi Mi A2, Modell: M1804D2SG, mit 6 GB RAM und 128 GB Flash-Speicher besprechen.

Das tolle an dem Gerät ist, dass es sich um ein Android One-Gerät handelt. Das bedeutet, dass diese Handys jeden Monat regelmäßige Sicherheitsupdates erhalten und damit etwa drei Jahre versorgt werden. Das Android-Betriebssystem ist dabei (fast) ein unverbasteltes Original-Android ohne Anpassungen des Herstellers. Die wenigen Zusatz-Apps, die Xiaomi vorinstalliert hat, können bis auf eine alle gelöscht werden. Auch sehr viele der vorinstallierten Google-Apps können gelöscht werden, wenn diese nicht benötigt werden.

Beim Test war eine Oreo 8.1-Firmware mit Stand der Sicherheitsupdates vom 05.11.2018 installiert. Android Pie (9.0) wird bereits ausgeliefert, ist auf diesem Gerät jedoch leider noch nicht angekommen.

Kommunikationsfähigkeiten

Leider unterstützt das Gerät kein NFC. Für Viele ist das heutzutage für die kontaktlose Zahlung mit Google Pay sehr wichtig und ein Fehlen damit ein KO-Kriterium.

Das Gerät unterstützt Dual-4G-Standby (d. h. es kann mit zwei SIM-Karten gleichzeitig ins Netz eingebucht sein und auf SMS oder Anrufe reagieren) und eine Vielzahl von LTE-Bändern. Das (zumindest) für Vodafone-DE in ländlichen Regionen extrem wichtige, langwellige Band 20 wird unterstützt, wie ich selber überprüfen konnte. Insgesamt soll das Handy die Bänder 1, 2, 3, 4, 5, 7, 8, 20, 38, 40 unterstützen. Das wären sämtliche in Europa vorkommenden Bänder und noch einige darüber hinaus.

Telefonie über 4G/LTE ist möglich, allerdings muss dazu einmalig nach Inbetriebnahme oder Reset ein “geheimer” Code zum Abschalten des “VoLTE Carrier Check” eingegeben werden. Dieser Code *#*#86583#*#* muss in der Telefon-Anwendung als “Telefonnummer” eingegeben werden. Danach erscheint in Einstellungen > Netzwerk & Internet > Mobilfunknetz > Erweitert eine neue Option Erweiterter 4G LTE-Modus, die den VoLTE-Modus einschaltet.

Ich habe mich durch einen Testanruf davon überzeugt, dass das Handy tatsächlich nicht auf den 3G-Modus zurückfällt, sondern während des Telefonats im 4G-Modus bleibt. Damit ist bewiesen, dass das Handy tatsächlich VoLTE-fähig ist. Die Sprachqualität war kristallklar!

WiFi ist auf beiden Bändern (2,4/5 GHz) möglich. Ich habe bei 5 GHz eine Nettodurchsatzrate von 300 MBit/s erreicht (Ookla Speedtest.net), was ein sehr guter Wert ist (ich habe einen 500 MBit/s Glasfaseranschluss, kann also tatsächlich leicht diese Datenraten erreichen). Die mit dem Access Point ausgehandelte Datenrate war dabei 433 MBit/s.

Das Gerät beherrscht Bluetooth 5.0, natürlich auch Bluetooth Low Energy (BLE). Ebenso beherrscht es GPS, Glonass (das russische Pendant) und BeiDou (das chinesische Satelliten-Navigationssystem).

Verschiedenes

Die Akkulaufzeit ist nur als “hervorragend” zu bezeichnen: Gut vier Tage hat das Handy durchgehalten. Dabei waren zwei SIM-Karten eingesetzt, das Handy war also mit beiden Mobilfunkmodulen ständig im Standby-Betrieb. In der Zeit habe ich das Handy eingerichtet (Einstellungen-Menü komplett durchgeschaut und viele Änderungen vorgenommen, Apps installiert und diese getestet), weil ich es gerade erst (für meinen Vater) neu erworben habe. Außerdem habe ich sehr viel Facebook und Nachrichten gelesen.

Das tolle, große Display von sechs Zoll Größe macht einen hervorragenden Eindruck und ist sehr klar abzulesen. Mit seinem Qualcomm Snapdragon 660-Chipsatz gehört das Handy zu den derzeit schnellsten Handys.

Die Verarbeitung des Handys ist tadellos, das Gerät macht einen durchaus edlen Eindruck. Sehr positiv finde ich, dass es keinen Glasrücken hat, da ein solcher bei Stürzen erfahrungsgemäß sofort zerspringt.

Was ich ebenfalls sehr positiv fand ist, dass eine Silikon-/TPU-Hülle mitgeliefert wird. Diese ist relativ dünn, bietet also wohl wenig Schutz gegen Stürze oder harte Schläge, ist aber allemale gut geeignet um Kratzer vom Gerät fernzuhalten.

Fazit

Für einen Preis von bereits um die 230 EUR erhält man ein hervorragend ausgestattetes Handy der Oberklasse, dem lediglich NFC fehlt. Für diejenigen, die damit leben können, kann ich nur eine absolute Kaufempfehlung aussprechen. Vielleicht für den einen oder anderen ein schönes Weihnachtsgeschenk? 😉
Huawei P8 (GRA-L09) modding

This post about “modding” of a Huawei P8 aims to summarize most of the standard procedures you need when you want to modify the device software (also called “firmware”), because you are a developer or want to be more flexible in how you use your device.

Normally, in order to gain this knowledge, you have to read a lot of “geeky” posts on sites like xda developers, which is very time consuming, and sometimes even leads to complete failure (you end up “bricking” your device), because many people there don’t bother to post clear and comprehensive instructions, but simply assume people have some pre-knowledge and know how to do things.

I don’t yet consider this post “finalized” yet (it needs some “polishing”), but I would like to make it available already now to make sure it won’t be forgotten… 😉

Fastboot Mode

“Fastboot” mode is a special mode your device can be put into in order to perform certain maintenance operations, such as (un-) locking your boot loader, flashing partition images, etc. The tool you use on your PC or Mac to communicate with the phone while it is in “fastboot” mode is also called fastboot. It is part of the Android platform tools which you can download here directly from Google.

Continue reading Huawei P8 (GRA-L09) modding

Sony Xperia X Compact Modding

I decided to write this post since I couldn’t find any single page that lists all the “secrets” you need to know when modding your Sony Xperia X Compact (XC) codenamed “Kugo” in a concise manner and in a single place. And after half a year when I last tinkered with my XC, I had forgotten about all the details again, so I had to research them again anyway…

I give credit to the following XDA people (but not limited to them, I apologize to those who I might have forgotten):

General Approach

The general approach when modding your phone is the following:

  1. Flash custom recovery
  2. Backup current installation/data
  3. (Optionally: flash latest stock firmware)
  4. (Optionally: flash custom recovery that works with your new stock firmware)
  5. Root
  6. Flash other mods or use “root” apps

Custom Recovery

Fastboot Mode

First let’s explain what “fastboot mode” is: Fastboot is both a tool and a protocol for writing data directly to your phone’s flash memory. In practical use, it is used to flash images such as recoveries, bootloaders, and kernels to your Android device.

The “fastboot” tool (as well as “adb” which is also needed when tinkering with your Android smart phone) is part of the Android “platform tools,” which you can download directly from Google (roughly 4M only).

To bring your phone into fastboot mode, perform the following steps:

  1. Switch the phone off.
  2. Hold “Volume up” and connect your phone to the USB port of your PC. The notification LED should first light up in red, then blue, and provided you have correctly installed drivers, you will be able to use fastboot commands.
    Note that the screen will remain black. You can check whether you are in fastboot mode with the following command:

    $ fastboot devices
    BH901XXXXX    fastboot

    If you see output similar to the above, you have successfully put your phone in fastboot mode.

Continue reading Sony Xperia X Compact Modding

My VerizonWireless prepay experience

We just returned from a one month vacation trip to Florida. In order to be able to use the internet when on the go, and also to be able to make and receive phone calls we decided to use a prepay card from VerizonWireless (VZW), as they seem to have the best 4G (LTE) coverage. The SIM is normally $45 for a month, including unlimited texts and calls and 1 GB of data, but we got it from Walmart for about $37, plus we received a free one-time bonus of 1 GB data when we activated the SIM via phone.

Our customer experience was pretty bad, and I want to share with you what kind of problems we had so that you can avoid those if possible.

The phone I intended to use was an iPhone 6 Plus. This cell phone is among the cell phones that have the most LTE bands available in the world, and I explicitly checked to make sure that VZW’s bands are covered. But when I tried to use the phone it couldn’t attach to the network. I got in touch with VZW, and it turned out that they only let phones use their network (with their own VZW prepay SIMs, that is!) that have been sold by or for VZW. But after talking to them for a while and letting them know about my disappointment (because in Europe this doesn’t seem to be common) they agreed to make an exception and have my iPhone authorized to use the network.

Even after four days (they said it should take 48 hours max), more than 3.5 hours talking to or chatting with their support, and even changing the SIM in a nearby VZW store, my iPhone still didn’t work, so I looked into other options. It turned out that you can buy simply 4G cell phones here real dirt cheap, so I bought a Motorola Moto E (2nd Gen) for less than $50. This phone immediately worked with the SIM I had.

I logged onto their MyVerizon prepay Desktop Home page to check and update some settings. This portal was another really bad experience, something which you really cannot ask your customers to use. The issues I encountered were the following:

  • After I had entered my address here in Florida (we lived in the house of relatives), there was trailing characters in the street address which I didn’t enter, and which I could not remove by any means.
  • Furthermore I couldn’t change my device from the original iPhone 6 Plus to the new Motorola Moto E — all changes (including IMEI which was verified to be “valid” and “known” to VZW) seemed to the accepted, and change of device was confirmed, but when I went into the main menu and back to “Device” the iPhone was still listed.
  • In addition I couldn’t change my Voice Mail PIN, probably the reason why voice mail was not available for my SIM during the whole month of our stay.

As an alternative to the bad web portal I installed the “My Verizon Mobile” Android app, but that was disappointing, too. There was absolutely no way to tell the app not to ask for the password again — a bad thing as I normally use “strong” passwords which I cannot easily remember, so how to use the app when on the go?! More issues encountered were

  • “Usage” details permanently give me “An error occurred while processing your request;”
  • in “My Features” I couldn’t activate the “Block Premium Messaging” option (even though changing the switch produced a confirmation that said the change was successful); every time I return to this menu item the setting is back to allow premium messaging;
  • in “Settings” > “Contact Info” I couldn’t make any changes, as the app declared my email address invalid (as it contains a “+” in the so-called “local-part,” which is the part left of the “@”). That was of course nonsense, as RFC-2822 allows such email addresses, I constantly receive mail on such addresses and VZW’s web portal allowed it as “valid;”
  • changing my Voice Mail Password (PIN) was also impossible in the Android app. I always got an error message saying “We are sorry, but we are not able to process your request at this time. Please try again later.”

What I must admit, though, their staff were always very friendly and tried to help — but what can you do if your IT systems let you down?!

The main reason I write this blog post is to let people from Europe know about the limitations they might encounter when trying to use their own phone with a local prepay SIM. But I also want to let VZW know my frustration with their bad self-service tools. This is not how you treat your valuable customers!!!

Aktuelle Smartphones verglichen

Kürzlich stand ich vor der Anschaffung von zwei neuen Mobiltelefonen (im Rahmen von Vertragsverlängerungen bei Vodafone). Daher habe ich die wichtigsten bei diesem Anbieter erhältlichen aktuellen Smartphones verglichen.

Folgende Handys habe ich verglichen (in alfabetischer Reihenfolge):

Apple iPhone 5S, Apple iPhone 6, HTC One (M8), HTC One (M9), HTC One mini 2, LG G3, Huawei P8, Nexus 6, Samsung Galaxy Alpha, Samsung Galaxy S5 16 GB, Samsung Galaxy S5 mini, Samsung Galaxy S6 32 GB, Samsung Galaxy S6 64 GB, Sony Xperia Z3 Compact, Sony Xperia Z3.

Die Kriterien bei meinem Vergleich waren Folgende:

  • Geschwindigkeit der CPU und Anzahl der Kerne
  • Größe des Arbeitsspeichers (RAM) und des internen Massenspeichers (Flash),
  • Bildschirmgröße und -auflösung,
  • LTE-Geschwindigkeit und Anzahl der LTE-Bänder (wichtig, da ich Geschäftsreisen auch auf andere Kontinente unternehme),
  • Verfügbarkeit von VoLTE,
  • Bluetooth/WiFi/WLAN-Versionen,
  • NFC-Verfügbarkeit,
  • Wechselbarkeit des Akkus durch den Benutzer,
  • Repair Score (wichtig, falls das Handy auch nach Ablauf der Gewährleistung weiter benutzt werden soll!),
  • Akku-Kapazität,
  • drahtlose Akku-Ladefähigkeit über Qi,
  • SIM-Typ und
  • Marktpreis.

Und hier nun der Vergleich in Form eines Excel-Sheets:

Handyvergleich 2015-07-09

War das hilfreich? Dann würde ich mich über entsprechende Kommentare hier in meinem Blog sehr freuen.

Update 2015-07-09: Excel-Sheet upgedated. Huawei P8 hat deutlich mehr LTE-Bänder als hier angegeben — insgesamt nämlich 16 beim Modell GRA_L09 laut Huawei selbst. Damit scheint es das Mobiltelefon mit den meisten LTE-Bändern zu sein.

How to install Android 5.0.1 on HTC Desire S

By chance I came across a thread on xda-developers that explains how to install CyanogenMod 12 (cm12) on an HTC Desire S (codename “Saga”). Being a newbie in “hacking” and rooting Android phones I had to read, investigate, and try a lot.

To spare you this effort I’m trying to summarize the steps required below:

  1. Unlock bootloader: To be able to flash a custom bootloader you first need to unlock the bootloader, which is easy since HTC makes this officially available via their web site.
  2. Flash recovery image: I used Team Win Recovery Project 2.8 (or short TWRP 2.8) which I downloaded from a link on this site.
  3. Flash cm12 and Google Apps: Download the latest cm12 image (on 2014-12-05 it was cm-12-20141204-UNOFFICIAL-saga.zip) from this page. Download Google Apps from this page. Put both ZIP files on the micro-SD card.
  4. Reboot to your recovery image by keeping “volume down” key depressed and then switching on the phone. Keep volume key depressed until TWRP splash screen appears. Perform a factory reset. Flash the two ZIP files, add cm12 first, then add Google Apps.
  5. Extract boot.img from cm-12-20141204-UNOFFICIAL-saga.zip and flash that with fastboot. Flash it using these instructions.
  6. Reboot your phone. CyanogenMod splash screen should appear after a while. Your first boot will probably take very long (I think for me it was about 15-20 min). Be patient!

After carefully following all the above instructions I now have the following on my HTC Desire S:

  • Boot rom HBOOT-2.02.0002 in mode S-ON
    bootloader
  • Radio/modem/baseband firmware RADIO-3831.19.00.110 (20.76.30.0835U_3831.19.00.110)
  • TWRP v2.8.0.0
  • Android 5.0.1 in the CyanogenMod flavor, version 12-20141204-UNOFFICIAL-saga. Kernel version is 3.0.101.
    cm-splash
  • Google Apps referred to from this page.

Thanks to everyone on xda-developers for their excellent work and support!

You might encounter the following issues which can be fixed as specified:

  • Touch screen not working properly: You have kind of a “mouse pointer” which you can drag around with your finger on the screen. To “click” something you have to double-tap on the mouse pointer. Fixing this can be accomplished by following this procedure.
  • The home softkey doesn’t work. Fix it by following these steps.

I had success with the following (not meant to be complete, just a couple of things which I consider important or surprising):

  • Sending audio to my Plantronics Blackwire C720 Bluetooth headset works properly, using Google Play Music. This was obviously using the “Media Audio” Bluetooth profile.
  • Skype via the above headset works perfectly well. Sound quality is crystal-clear.
  • Hand-over of a voice call to the above Bluetooth handset and back works perfectly well — maybe even better than on my S4… 🙂
  • Paired my Samsung Galaxy S4 with the HTC Desire S. Successfully sent a contact as VCF file from the S4 to the Desire S. But then process com.android.media crashed.
  • Connect phone to Windows 7 via USB, using MTP protocol. Write speeds to micro-SD card seemed normal.

The following limitations still exist (or at least these are the ones I noticed so far):

  • Phone is somehow regarded as a tablet by the Android OS.
  • Front camera not working. I thought I had seen it working once, but maybe I’m confused. Anyway, as of now the front camera seems not to be detected/functioning. The back camera is working well with the camera app from the minimal Google Apps package as well as from the official Google Camera you can download from Google Play. Skype and Google Hangouts also work well, apart from the front cam.
  • I replaced some of the apps in the apps dock with apps I installed from Google Play. Some of these apps will disappear after a reboot. When I noticed this and wanted to put them back by opening the apps drawer I observed that Android was currently populating/updating the apps drawer with some still missing apps. But even after it had finished showing all installed apps in the app drawer the apps dock was still missing some apps. So I dragged them back from the drawer onto the dock. Again, after a reboot they will be gone again.
  • Speed of cellular data connections seems slow. Unfortunately I couldn’t verify whether the cellular network settings are ok, since every time I tried to enter one of the corresponding  Settings menu item the process com.android.phone would crash (with the effect that I had to re-enter my SIM PIN and also the screenlock PIN).
    Later I tried it again, and this time it didn’t crash. All the settings were fine, so I wonder whether there is a problem with regards to the modem firmware? (I would like to note that I don’t have a voice SIM in this mobile phone, but just a data-only SIM. Eventually the firmware tries to perform operations that work on voice SIMs and doesn’t properly handle situations where those operations cannot be carried out?!)
  • Update 2014-12-11: Connecting the charger when the phone is powered down will cause it to boot into the TWRP recovery system.
  • Trying to open menu item Wireless & Networks > Cellular networks > Carrier Settings might cause process com.android.media to stop.
  • Ringtone will be quiet on incoming calls.
  • Microphone will be muted (or not properly amplified) when the first outbound(!) call takes place (in non-speakerphone mode). After you have gone on speakerphone and back, the microphone will then be working.
  • Moving apps to the external SD card is unreliable. Often it doesn’t work without any indication as to why. If you then repeat it again it may actually work.