(In case you wonder, TPM attestation means that a party using a secret key can prove the secret key is handled securely by means of a hardware module, so it cannot be misused or accidentally exposed.)
AMD made a fix available already more than 2 years ago, according to said article.
I was curious and wanted to find out if MSI provided this fix to their customers already, so I executed the below PowerShell command (as an admin) on my PC that is equipped with a B550M PRO-VDH WIFI motherboard, running the latest UEFI version 7C95v2M (released 2025-04-17) as of today (2025-07-11):
As you can see, my board has a firmware version of 3.92.0.5 installed, which matches 3.*.0.* as vulnerable, while 3.*.2.* would have contained the fix.
This is very disappointing. I chose MSI and paid a premium price because I trusted MSI. It seems that when my other PC no longer receives Windows 10 updates in October, I need to choose a different supplier than MSI to build a new PC. 😞
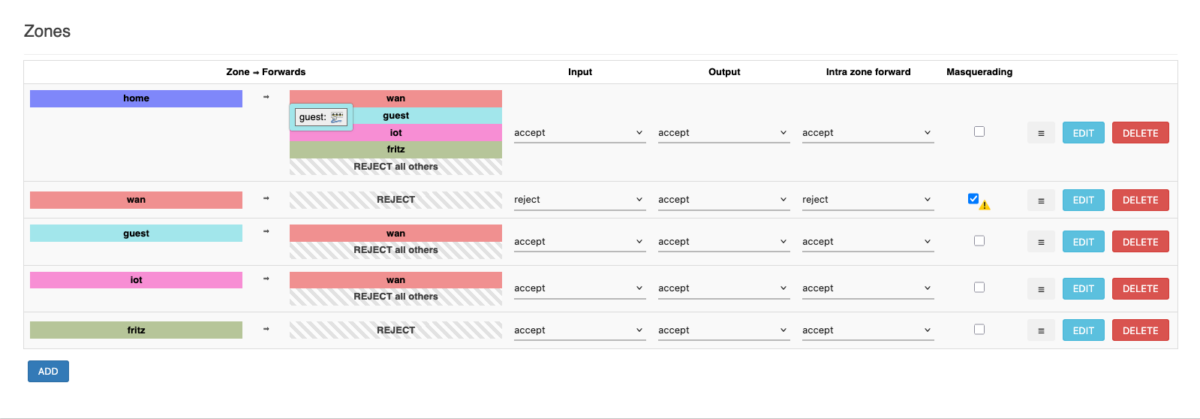
I recently configured my router to be a WireGuard gateway, so that I can dial into my home to reach my NAS. After I had set it up and all seemed to be working well, I noticed that IPv6 packets didn’t get out to the internet, when I did a ping on my laptop:
I immediately suspected a routing issue, and so I did the below test on my router:
root@gw:~# ping6 -I fd00:9::1 ipv6.example.net PING ipv6.example.net (2a01:123:456:7890::2) from fd00:9::1: 56 data bytes ping6: sendto: Network unreachable
This seemed to have confirmed my suspicion. But why is there a routing issue?
I remembered that the WireGuard clients are all using reserved IP addresses — both IPv4 and IPv6. For IPv4 my router is doing masquerading, but it doesn’t do so for IPv6. It passes these addresses (from public address space!) out to the internet, which is the default setup for OpenWrt.
Now, in the case of the VPN network, where reserved addresses from the range of fd00:9::1/64 are used, packets with source addresses from the reserved IP address range can’t be routed on the internet, which is why I was seeing the “Network unreachable” error message.
I just acquired a new keyboard, a CHERRY MX 8.2 TKL Wireless, for use with several different machines (as I use it connected to a USB switch, that is used by 4 different machines), and macOS was acting up again. The “less than” (<) and “greater than” (>) keys were at the wrong place, as was the “caret” (^) key. They had exchanged their positions, so to speak.
It turned out that this was due to the fact that the “keyboard type” was set to “ANSI,” instead of “ISO.” In theory, this should be easy to configure in macOS’ “System Settings”, however, this didn’t work for me. Many people have this issue as I found out, and sometimes there doesn’t seem to be a straight-forward solution, so I decided to wrap up these quick instructions how to force your Mac to use ISO.
The settings are contained in /Library/Preferences/com.apple.keyboardtype.plist, and you can display them as follows:
I was recently in Egypt for two weeks of vacation. As I’m running my own “bare-metal” root server, I needed to take care of it even while on vacation, to look after updates and alerts on a daily basis.
So I prepared myself well, and I would like to briefly let you know what I did, and what worked, and what didn’t work.
Preparation
First, I set up WireGuard on my server. It’s a UDP-based VPN that is very lightweight and fast. By chance I found out, though, that Egypt doesn’t work in Egypt, as it’s being blocked by Egypt’s authorities. 🙁
So I looked for alternatives and came across Outline. Outline is not actually a “real” VPN, but a proxy using the Shadowsocks protocol, which was explicitly designed to circumvent internet censorship. It can also proxy UDP traffic.
That is one amazing piece of software.
For certain Cloud Service Providers (Digital Ocean (just $4/mo.!), Google Cloud, Amazon Web Services), you can literally install it with a single click in a desktop app, the Outline Manager, which is available for Windows, macOS, and Linux.
[According to my own standards, this post about “UEFI booting” was only like 70% “ready” — I had it pending in “draft” state for many months, because I was lacking the time to finish it… I now decided to release it in its current state, simply because I believe it will still be very useful to many people interested in the topic…]
Before we actually dive deep into how UEFI booting works, a short and simple introduction is due.
Introduction
What is UEFI, anyway?
UEFI could be called the successor of the old BIOS concept. It is a unified version and successor of “EFI”, which was an architecture for a platform firmware used to boot operating systems (in the following abbreviated as “OS”), and the corresponding interface to interact with the firmware and the operating system.
The advantages of UEFI over the traditional BIOS are, among others, the following:
Boot disks with large partitions (over 2 TB), using GUID partitioning (GPT),
network capabilities already in pre-OS phase, and
modular design.
Boot Mechanism
So, how does booting with UEFI work?
When you enter your UEFI, you will find a user interface that shows all devices that have been detected, and that support booting. Usually that includes all your hard drives.
You can freely define a desired boot order (regardless of hardware paths, i.e. the way your drives are connected, be it via an SATA port, be it via an NVME slot), i. e. the primary OS that should be booted, if that fails the next OS that should be tried, etc. That’s called your “boot configuration”, and it resides in your motherboard’s NVRAM. (a concept that’s basically the successor of what used to be called “CMOS” in the old days of the BIOS). More specifically, we speak about “UEFI Variables“, which allow the OS and the firmware to interact.
When UEFI’s Firmware Boot Manager wants to boot an OS, it first needs to load something called the OS “Boot Manager.” Common OS boot managers are:
BOOTMGFW.EFI used to load Windows, or
SHIMX64.EFI used to load Linux
The OS boot manager is located on the “EFI system partition” (ESP). This is a small partition (usually only a few 100 M) at the start of your hard drive, formatted with basically a FAT filesystem. FAT is a very simple filesystem, so that the code to parse it and load files from it can be reasonably small and fit into a boot firmware.
A typical disk layout for a Windows installation may look as follows:
UEFI /EFI System Partition as seen under Windows
The first partition is the ESP, then comes the Windows boot and system drive (with a drive letter of C:), and then comes the recovery partition.
Apart from boot loaders, the ESP can contain kernel images or (device) drivers, e. g. to support hardware that must be initialized prior to the start of the OS, or to give access to a complex filesystem that holds the actual OS to be booted.
Depending on which OS you want to boot, the OS boot manager then loads
in the case of Linux: the OS kernel, and the kernel in turn loads the OS, or
in the case of Windows: the Windows Boot Loader (\Windows\system32\winload.efi)
Boot Configuration Details
Now that we got a good overview of the mechanism as a whole, let’s dive into the details. Let’s look at the boot configuration of my machine. To do so, invoke the below command (I did it under Ubuntu 23.04, but it should work the same under any reasonably current Linux distro where the tool is installed):
So, what does the above tell us? First, we see that “(Boot)0003” is the boot entry used to start the currently running system. Secondly, the order in which boot is tried is 0000, 0002, and then 0003. So by default, Windows (by the “Windows Boot Manager”) will be booted. Then we see the three boot entries. The star/asterisk (*) after the boot entry shows that all these entries are “active.”
What about the remaining info in the above command output? Immediately after the boot entry, we see the names that are also displayed on screen by the Firmware Boot Manager (“Windows Boot Manager” and two times “ubuntu”). We then see references to the ESPs used to boot these OS.
HD obviously means “hard drive”, then we see a 1 which refers to the first partition on the respective drive, then we see GPT which refers to the partitioning table format, and then we see a UUID. To find the respective partitions, we can use the below command:
The PARTUUID values in the above output match the UUIDs in the boot configuration as shown by efibootmgr. So, the ESPs are located by searching for the partitions’ UUIDs. That means that you can replug your drives to different ports, or even copy partitions to different drives, and the UEFI boot mechanism will still find them. That’s a nice and very stable design.
UEFI User Interface
Now, let’s enter the UEFI and look at some of the details there. My PC’s motherboard is an MSI, and to enter the UEFI I need to press “F2” after the beep when powering on the PC (from “off” state, not when suspended to RAM, i.e. “sleeping”!) or restarting it.
This is a quick-and-dirty review of the Excire Search 1.4.1 plugin for Adobe Lightroom. I got this plugin for free in an online “advent calendar”. As it was free, I can’t expect anything, obviously. But still I can tell you what I think about the tool. 😉
Let me mention that version 1.4 is not the latest version as of today. So the more recent 2.0 version may be performing much better than the one I tested, but I have no way of verifying this.
So, what is this tool about? Excire Search is a photo organizing software that sifts thru your photos in order to organize them. The company claims Excire Search is “The best software for organizing your photo treasures”, using AI it analyzes and tags photos automatically so that “image management [is] fun again.”
Ok, let’s see how helpful the tool actually is. One category that Excire creates in your keyword hierarchy is “Image Color.” So if you are searching for images of a certain color, this should be helpful, right? Well, have a look yourself. This is the hierarchy it created for some 15K photos I have in this Lightroom catalog:
“Image Color” keywords
Let’s have a look at some of the images Excire classifies as “black”:
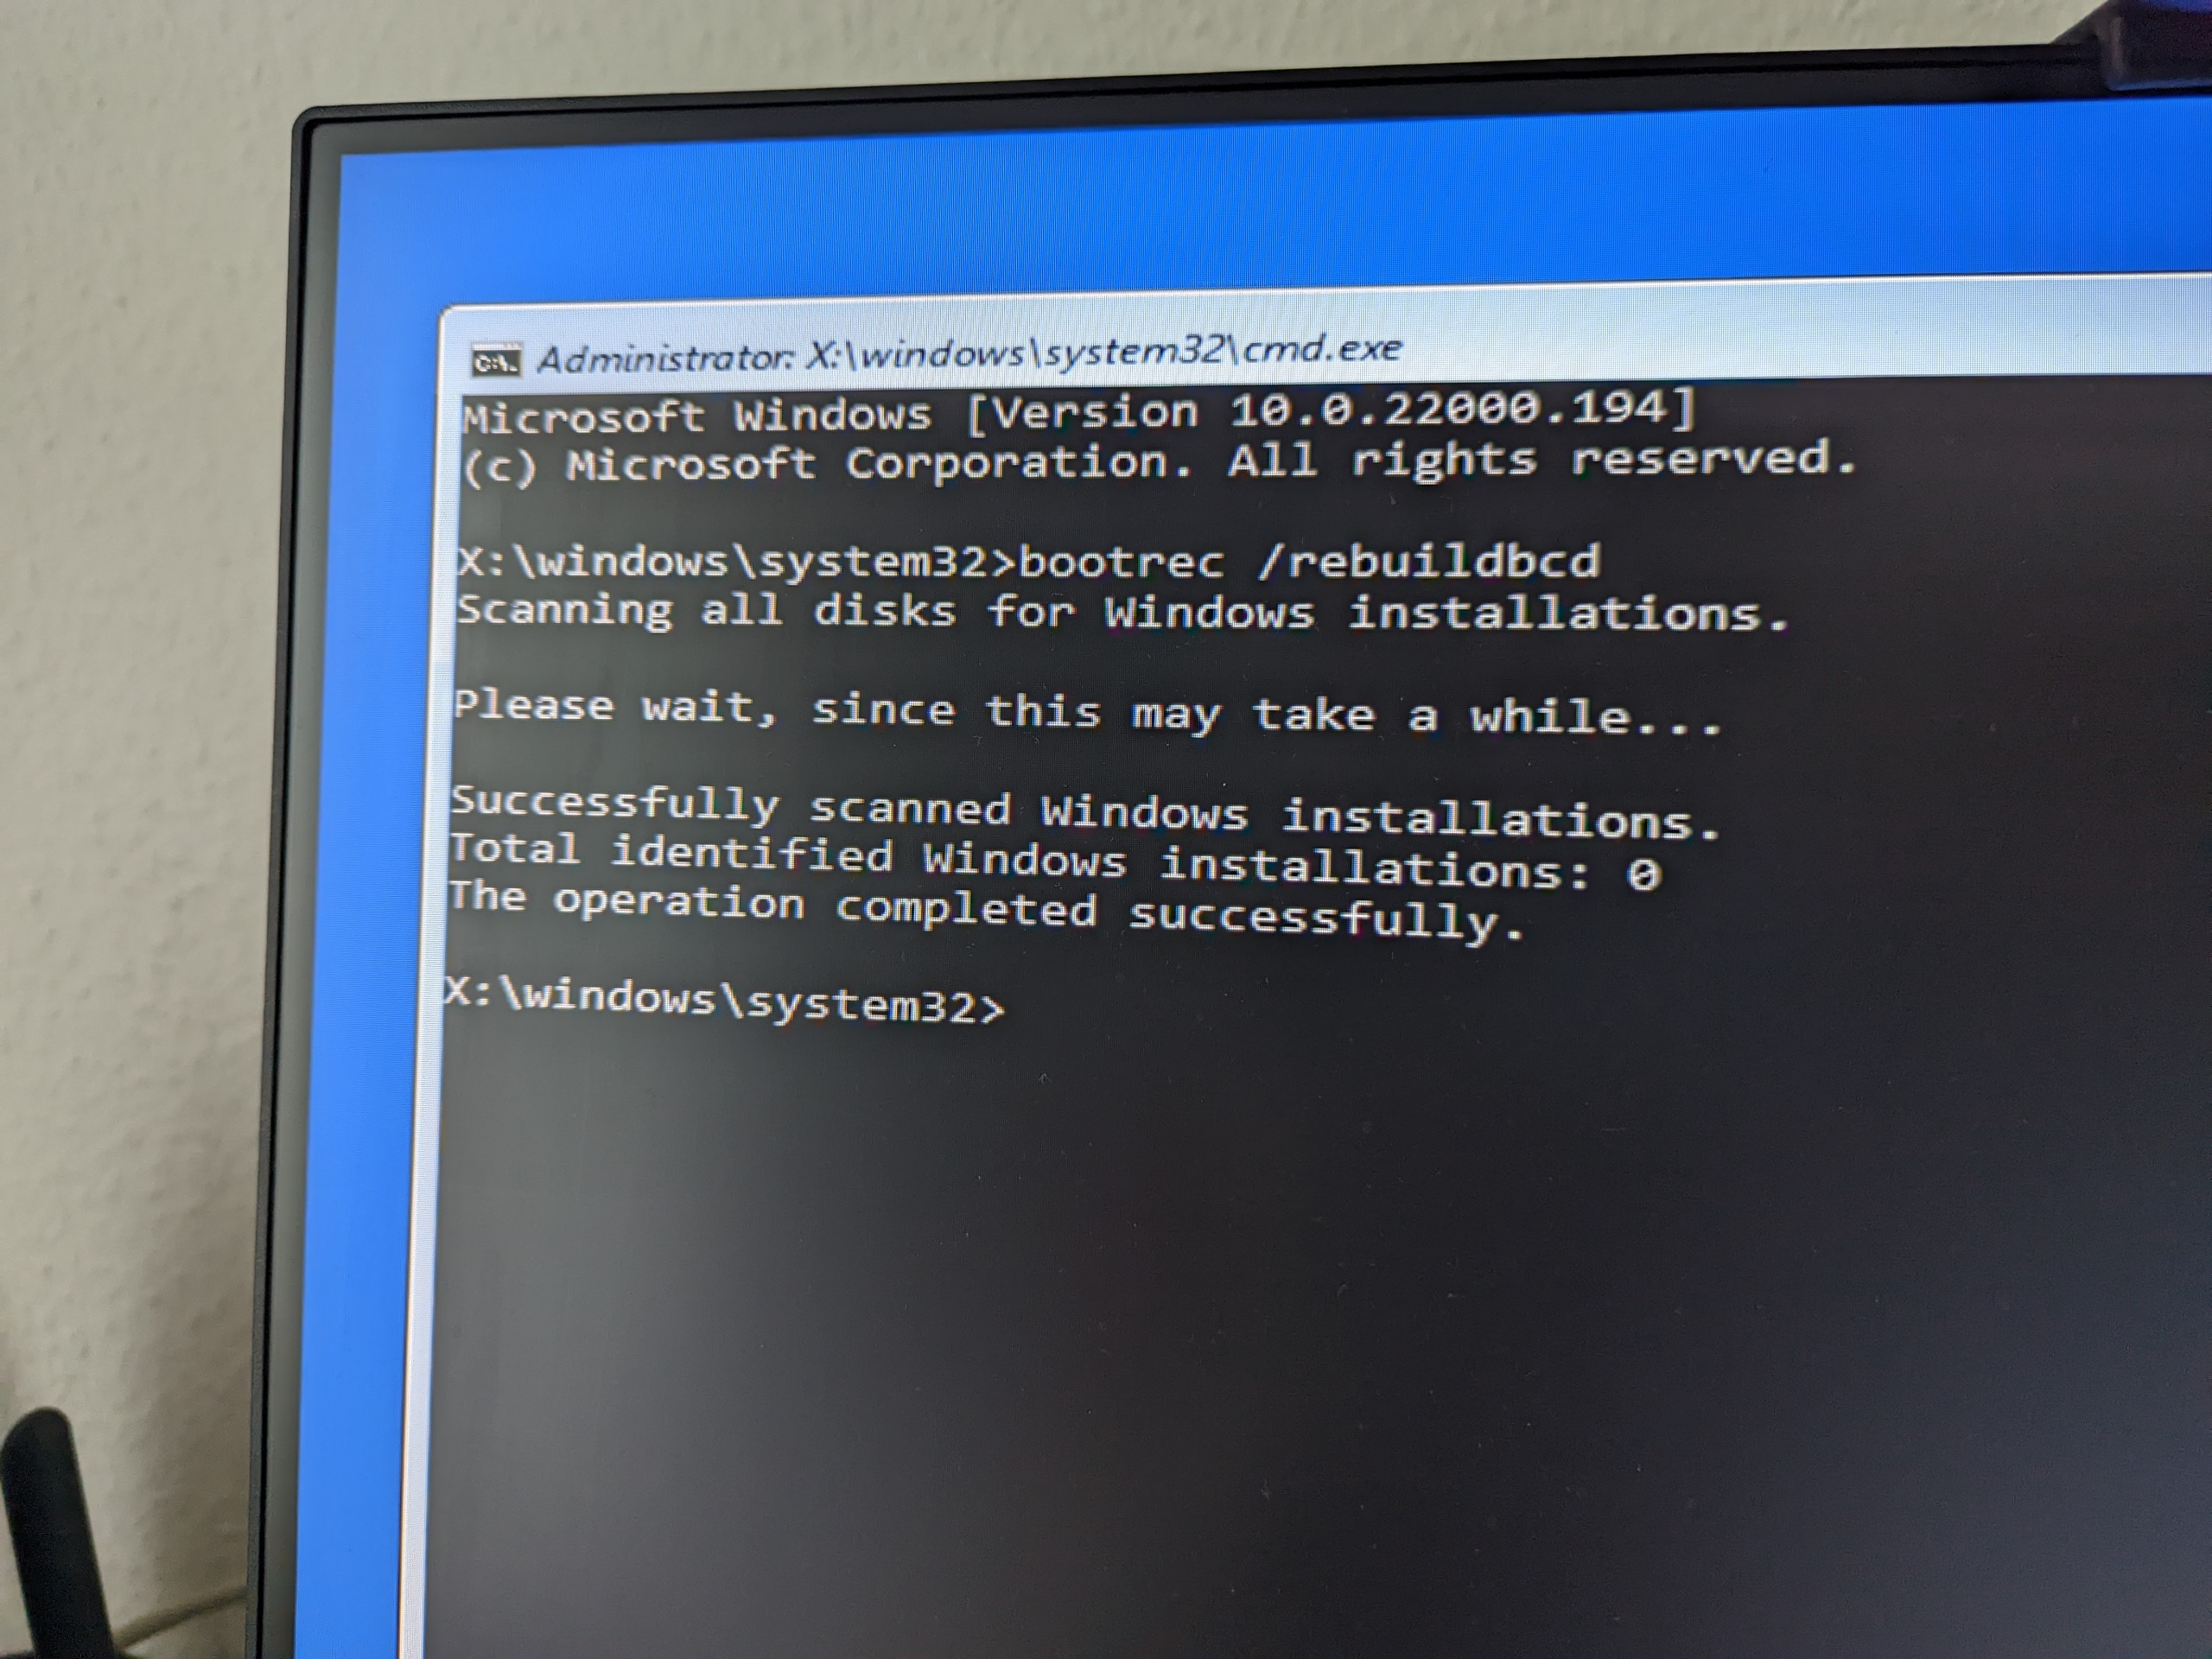
I recently had a mishap where on a system that I had just upgraded from Windows 10 to Windows 11 the Windows BCD Store (Boot Configuration Data Store) was suddenly messed up, presumably by a patch update I had taken earlier:
Blue screen showing “Wiederherstellung: Der PC muss repariert werden.” (German for: “Recovery: The PC must be repaired.”), hinting to a problem with the Windows BCD Store.
But what if the scan for all Windows installation turns out not to identify yours?! Like in the below photo?
Photo of a Windows RE session, failing to automatically rebuild the Windows BCD Store
Are you SOL then?
Don’t despair.
The solution is actually quite simple. Other than the above which is supposed to be fully automatic, it involves some manual tasks, but it should be quite easy if you are at least a bit tech-savvy.
As a long-time Android user (since the days of Android 2.0, if I remember correctly), I have seen many things already, especially as I was involved in the development of mobile phones, and also fiddled a lot with CyanogenMod, LineageOS, and other custom ROMs. Still, I recently discovered something new for myself, and this is something I really find spectacular. It’s a new mechanism to flash Android firmware builds, and it’s called “Android Flash Tool” (AFT).
Let me elaborate…
Usually, to reflash a device you need to install a program on your workstation, like a vendor flashing tool, or the Android Debug Bridge (adb) command-line tool. With the Android Flash Tool, this is no longer required. The only thing you need is your WebUSB-capable (browser). 🙂 Currently, only Chrome or Edge support it. (Firefox currently doesn’t support it due to security concerns.)
Also, the number of devices which support the AFT is very, very limited. Basically, it’s just the Google Pixel series of phones, plus a few development boards.
But if you have one of those devices, it’s pretty cool.
I have a quite complex infrastructure in my house, and I monitor everything. Among others, I have SmokePing probes towards multiple destinations in my LAN, and also to my internet provider’s infrastructure, and even external hosts.
When I added a graph for the management IP of my Netgear GS108Ev3 8 Port Gigabit Ethernet Smart Managed Plus Switch, which is my “core” switch, I noticed that there is a huge packet loss, in the range of 4% average, about 40% max.
The strange thing is that other destinations in my LAN which can be reached via this switch, have absolutely zero packet loss. That means that the cabling itself is definitely ok, and also that the packet switching functionality of the switch is ok.
So I opened a ticket towards NetGear, and the response I got was quite surprising (but still somehow makes sense):
This is a known issue, and it is by design. The put the highest priority on the packets flowing thru the switch, while the management traffic has a lower priority, so that ICMP packets to the switch’s management IP may get lost, and in extreme cases the web UI may not be reachable at all.
It’s not a big issue for me, because in the end I wanted to create graphs that exhibit whether I have any internal packet loss. Whether the switch’s management interface has packet loss or not is not really important to me. As long as all my internal devices that I actively use, like my NAS devices or streaming boxes, are properly connected with no packet loss, all is well. 🙂
We use cookies on our website to give you the most relevant experience by remembering your preferences and repeat visits. By clicking “Accept”, you consent to the use of ALL the cookies.
This website uses cookies to improve your experience while you navigate through the website. Out of these, the cookies that are categorized as necessary are stored on your browser as they are essential for the working of basic functionalities of the website. We also use third-party cookies that help us analyze and understand how you use this website. These cookies will be stored in your browser only with your consent. You also have the option to opt-out of these cookies. But opting out of some of these cookies may affect your browsing experience.
Necessary cookies are absolutely essential for the website to function properly. These cookies ensure basic functionalities and security features of the website, anonymously.
Cookie
Duration
Description
cookielawinfo-checbox-analytics
11 months
This cookie is set by GDPR Cookie Consent plugin. The cookie is used to store the user consent for the cookies in the category "Analytics".
cookielawinfo-checbox-functional
11 months
The cookie is set by GDPR cookie consent to record the user consent for the cookies in the category "Functional".
cookielawinfo-checbox-others
11 months
This cookie is set by GDPR Cookie Consent plugin. The cookie is used to store the user consent for the cookies in the category "Other.
cookielawinfo-checkbox-necessary
11 months
This cookie is set by GDPR Cookie Consent plugin. The cookies is used to store the user consent for the cookies in the category "Necessary".
cookielawinfo-checkbox-performance
11 months
This cookie is set by GDPR Cookie Consent plugin. The cookie is used to store the user consent for the cookies in the category "Performance".
viewed_cookie_policy
11 months
The cookie is set by the GDPR Cookie Consent plugin and is used to store whether or not user has consented to the use of cookies. It does not store any personal data.
Functional cookies help to perform certain functionalities like sharing the content of the website on social media platforms, collect feedbacks, and other third-party features.
Performance cookies are used to understand and analyze the key performance indexes of the website which helps in delivering a better user experience for the visitors.
Analytical cookies are used to understand how visitors interact with the website. These cookies help provide information on metrics the number of visitors, bounce rate, traffic source, etc.
Advertisement cookies are used to provide visitors with relevant ads and marketing campaigns. These cookies track visitors across websites and collect information to provide customized ads.