Categories
Computers English Storage Uncategorized WTF

Synology refuses to admit annoying “Cloud Sync” Bug

Since about half a year I’m struggling with a very annoying bug in Synology’s “Cloud Sync” package I’m running on my expensive Synology DiskStation DS415+ NAS. It is still present as of today’s DSM 6.0.2-8451 Update 2.

I would like to backup my photos to my Amazon Drive/CloudDrive. As an Amazon Prime customer I can store an unlimited number of images, and only images — other files, like *.xmp sidecar files, will count against my general 5 GB limit.

The problem is that Synology’s Cloud Sync will upload the sidecar files, even though I explicitly only select “Images” to be backed up (and *.xmp is not part of Images, as I will show you!).

Categories
Communications English Routers

Update U-Boot on TP-Link TL-WDR4300

A couple of days ago while I was working from home my trusted TP-Link TL-WDR4300 seemed to have died suddenly (just a couple of days after the two year warranty had expired!) — at least this was the result of my initial investigations.

The symptom I had is that suddenly my internet connection seemed to be down — which was surprising enough, as since I upgraded to VDSL2 vectoring my line was rock-solid, and it normally dropped only once a month or even once every couple of months. When I tried to find out what happened I noticed that my router was inaccessible, I couldn’t even ping it. I thought it had crashed, so I power-cycled it to reboot it, but it didn’t come up…

So my conclusion was that it had died.

I quickly reconfigured a Linksys WRT1200AC which I bought a couple of months ago as a spare device, meant to replace the current router “one day”, and put it into operation…

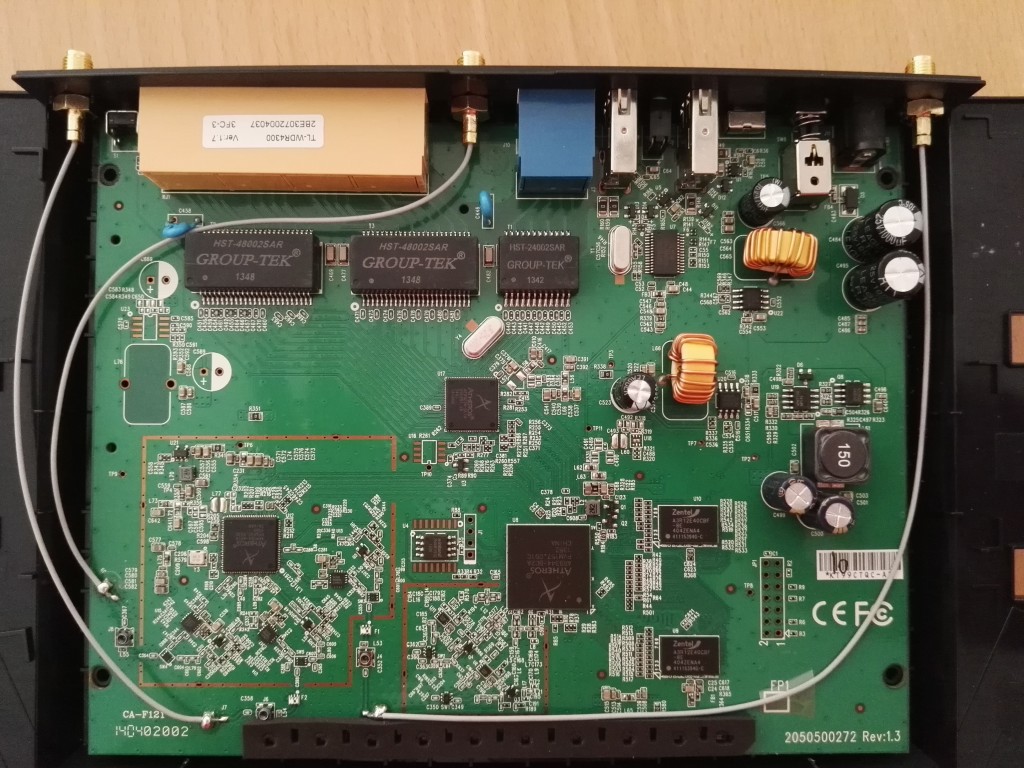
Today I spent some time investigating what actually happened. I wanted to use the serial console of my rev. 1.7 device (the PCB is rev. 1.3), but found that there was no connector in place for the UART, just the holes in the PCB.

dav

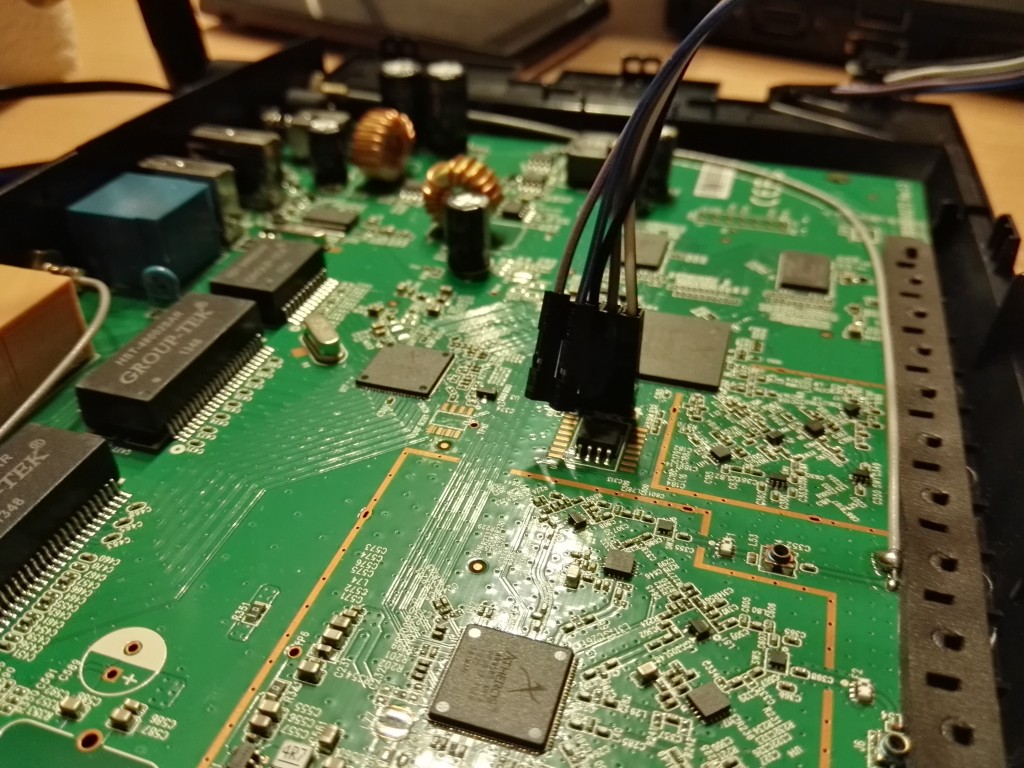
So I quickly soldered in the pins, and connected the router to a laptop.

sdr

To my surprise the router booted without any issue at all. I played around with it until I was sure that there was absolutely no problem — I thought the file system in the flash memory might have been corrupted, but everything was ok.

So now that I had opened the device and connected a laptop to the serial console, I thought it would be a good occasion to update the U-Boot boot loader to a modified one by “pepe2k” that adds a lot of very useful features.

I used the instructions pepe2k provided on Github, specifically the part where he describes how to install via TFTP from the serial console. The “biggest challenge” was to find where to download the actual boot loader binary. Finally I found it here.

Categories
Security Windows

Bitlocker: How to require Startup PIN

A lot of people use Bitlocker for full-disk encryption of their hard drives. For extra security you might want to be prompted for a PIN when you unlock your hard drive, because allowing attackers to boot your system without authentication might open up extra attack vectors. Setting a PIN can be easily accomplised if you know how… 🙂

The below instructions are exact for Windows 10, but they are very similar in Windows 7, too.

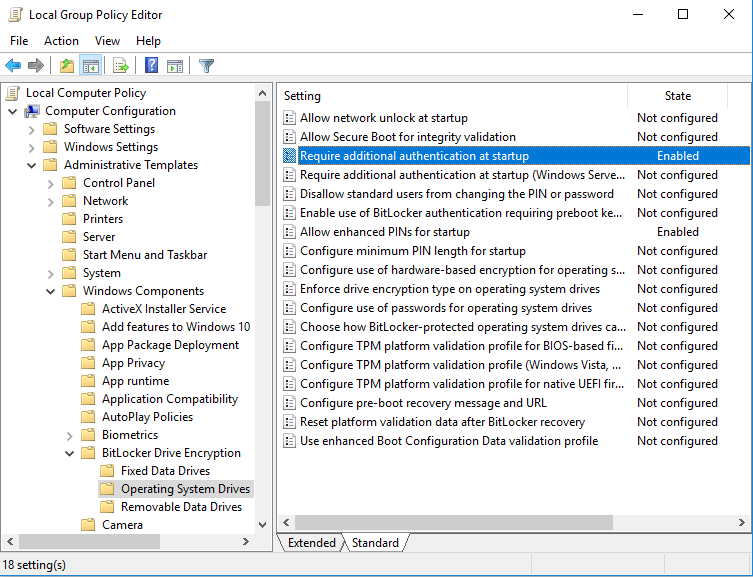
Launch the Local Group Policy Editor by typing gpedit.msc into your Windows search, then when it has been found right-click on it and select Run as administrator from the pop-up menu. Then maneuver to the following path in the left “folder” pane:

Local Computer Policy > Computer Configuration > Administrative Templates > Windows Components > Bitlocker Drive Encryption > Operating System Drives.

This is what it looks like if you did it correctly:

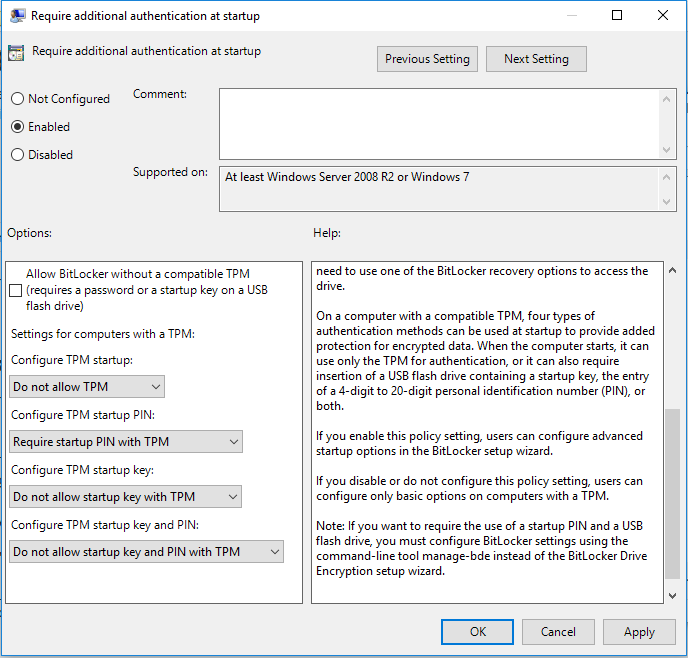
Bitlocker_Group_PolicyThen double-click on the setting Require additional authentication at startup, and you see the following dialog:

Bitlocker_PINNow change option Configure TPM startup PIN to read:

Require startup PIN with TPM

Then reboot. Now you can right-click on your system drive and select Set Bitlocker PIN or Change Bitlocker PIN (I forgot to take a screenshot of this last step, so I’m not 100% how exactly this looked like, but it should be obvious) from the pop-up menu.

You’re done. Wasn’t that easy?

Please leave a message if this was helpful.

Categories
Computers Security Windows

Attention changing BIOS Settings with Bitlocker

The Problem

If your laptop has been set up to use Bitlocker, by your company or yourself, you should be very cautious when playing with your BIOS settings.

Bitlocker considers BIOS settings changes a potential security breach, as somebody could e. g. change boot order to boot from an external media to try to fiddle with the boot mechanism set up on your hard drive or SSD. This is why when you change something in the BIOS or just boot from an external drive, such as a thumb stick, Bitlocker will prompt you for your recovery code.

The Solution

To prevent this you just have to disable the so-called “protector” for your boot drive. Only then should you change BIOS settings or boot from a drive other than your normal boot drive.

You do so using the manage-bde tool which is part of Windows:

manage-bde –protectors –disable <Drive>

Don’t forget to re-enable the protector after you’re done:

manage-bde –protectors –enable <Drive>

If this helped, I’d appreciate a comment from you here on my blog.

Categories
Networking

Genexis FiberTwist-P2410 dissected

By chance I got an early hands-on on a fiber network terminator (NT)/broadband gateway (such a device will soon be installed for my FTTH line provided by “Deutsche Glasfaser.”) I don’t know how it happened, but it suddenly fell apart, so I had a brief look under the hood… 😀

IMG_0673
Genexis FiberTwist-P2410 inside view

The SoC is a Lantiq PXB 4369 EL V2.1 (GRX300), which is a Gigabit Ethernet Router/Gateway SoC with int. 2×2 WiFi. There aren’t any antennas, though, and it seems you can’t add any either. The device is from the GRX 300 series, which is a “CPE Network Processor with integrated WiFi.”

A Russian web site states that its actually the GRX369 series, and that the SoC is clocked with 600 MHz. (Update: The CPU is a MIPS 34Kc V5.6 clocked at 600 MHz, 397.82 BogoMIPS.)

The device can be simply twisted on the wall junction box which is the provider’s fiber hand-over point (“fiber management unit,” FMU.)

On the WAN side we have a Mentech FGE20-N9C-35S as the optical transceiver module (2×5 form factor) for single-mode fiber in passive optical networks (PON). Optical wavelength division multiplexing (WDM) is used so a single fiber can be used for both downstream and upstream data. The maximum data rate this transceiver can handle is 1.25 Gbit/s (which suggests we’re talking EPON, 802.3ah-2004 here…). The reach without intermediate amplification is 20 km(!). Wavelengths of 1,310 nm (upstream)/1,490 nm (downstream) are used.

For LAN connectivity the gateway has 4 Gigabit Ethernet ports, driven by two FPE LG48204DH 2-port LAN transformer modules in a DIP-48 package.

The transceiver is a Marvell 88E1512-NNp2 out of the “Alaska” series, 10/100/1000 BASE-T single-port PHY (so it seems that all fiber/Ethernet ports are on the same switch), supporting Energy Efficient Ethernet (EEE) and Advanced Virtual Cable Tester functionality.

Update: The switch seems to be a Lantiq VRX318 (or compatible).

Firmware is stored in a Elite Semiconductor (ESMT) F59L1G81LA-25T single-level serial (SPI) NAND flash chip in a TSOP48 package. It operates with 3.3V at a clock of 25 ns and has a flash density of 1 Gbit and a bus width of 8 bits. The total memory size is 128 MByte.

RAM is provided by a Winbond W971GG6SB-25 chip, which is a DDR2-800 (5-5-5) SDRAM chip with a size of 128 MByte, operating at transfer rates of 800 Mbit/s per pin with a power supply of 1.8 V. (Update: The RAM is actually clocked at 300 MHz.)

It seems that the broadband gateway is equipped with a serial-console connector.

Here’s another photo that shows where the key components are located:

Genexis FiberTwist-P2410 with key components

Please let me know if this in any way helps you, or you can contribute to this post.

Categories
Communications English Networking Routers

uhttpd with a certificate chain

To secure access to my router I wanted to use SSL encryption to access LuCi, so I obtained a certificate issued by a well-known CA. The server certificate was not issued directly off the CA, but there was a certificate chain in between.

Using a certificate chain with OpenWrt’s uhttpd is really easy, although as of today this is not yet even documented to be possible on the OpenWrt web site.

I’m using uhttpd_2015-11-08 from a trunk build (r48648) of “Designated Driver”, and certificate chains can be used here without problems.

I didn’t even have to convert from PEM to DER, I just concatenated the server cert and intermediate certs into a single file:

cat /root/server.crt /root/1_root_bundle_1.crt /root/1_root_bundle_2.crt >uhttpd.crt

Hope this helps. If it does please leave a message, thank you.

Categories
Communications Computers deutsch Networking

Brother MFC-7840w “Internet Fax” über DUS.net

Seit einigen Tagen habe ich einen “IP-only”-Telefonanschluss, so dass ich nicht mehr wie bisher mit meinem Brother MFC-7840w-Multifunktionsgerät über einen a/b-Terminaladapter an einem ISDN-Anschluss faxen kann.

Beim Suchen nach Alternativen stieß ich auf dieses Wiki im IP-Phone-Forum, welches mir sehr weiter geholfen hat.

Zunächst musste ich ein Firmware-Update für mein Faxgerät flashen, was die benötigte Internet-Fax-Funktionalität  (T.37-Protokoll) implementiert.

Weiterhin musste ein Anbieter gefunden werden, der dieses Protokoll unterstützt. DUS.net, welches auch im obigen Wiki erwähnt wird, war mir ohnehin schon bekannt, weil ich auf der Suche nach einem guten SIP-Provider bin. Also wollte ich gerne DUS.net als Fax-Provider nutzen, jedoch gibt es da ein prinzipielles Problem:

Um das Dus.net mail2fax Gateway anzusprechen, müssen Zugangsdaten > 50 Zeichen im Betreff-Feld übertragen werden. Die Brother-Firmware (4.0) speichert aber nur 41 Zeichen ab.

Meine Lösung sieht nun so aus:

Categories
Communications deutsch Networking Routers

Vodafone SIP-Account manuell einrichten

Update 2019-09-10: Sven Brinkmann teilt mit, dass der STUN-Server nicht mehr benutzt werden muss. Das erklärt dann wahrscheinlich auch, warum der Hostname nicht mehr existiert. 😉

Update 2018-12-27: Meine Leserin “DANi” teilte mir mit (vielen Dank!), dass sich zwischenzeitlich die Hostnamen geändert haben, so dass z. B. stun.arcor.com nicht mehr existiert (stimmt, habe ich überprüft). Diese Anleitung ist daher nicht mehr anwendbar! Falls jemand die korrekten Daten kennt, dann werde ich sie nach einem entsprechenden Hinweis gerne hier ergänzen.

Wer nicht die Standard-Hardware der Provider verwenden will sondern “eigene”, der steht oft vor dem unlösbaren Problem der manuellen Konfiguration der einzelnen Geräte.

Bei Vodafone als Anbieter kann in diesem Fall der Modem-Installations-Code (MIC) nicht benutzt werden. Stattdessen müssen folgende Daten in das jeweilige SIP-Gateway eingetragen werden:

  • Authentication name: VorwahlRufnummer, also z. B. 021199999999.
  • Authentication password: Das Sprachpaßwort
  • Username: der selbe Wert wie für Authentication name
  • Display name: Falls der verwendete SIP-Client oder das eigene SIP-Gateway diesen Parameter unterstützt, kann dort der eigene Name eingetragen werden, also z. B. “Michael Mustermann”.
  • Domain: 02182.sip.arcor.de:5060 (statt 02182 müsst Ihr Eure eigene Vorwahl eintragen!
  • STUN server: stun.arcor.com:3478 Scheint nunmehr obsolet zu sein!

Das so genannte “Sprachpaßwort” erhält man (hoffentlich) auf Anfrage von Vodafone. Früher scheint das ein Problem gewesen zu sein, heute sollte sich der Anbieter nicht mehr querstellen. In Zukunft — Stichwort “Abschaffung Routerzwang” — ist Vodafone ohnehin von Getzes wegen gezwungen, diese Information heraus zu geben.

Mit den oben genannten Einstellungen sollte die Einrichtung “fremder” VoIP-Hardware oder eines Software-Clients kein Problem sein. Ich betreibe erfolgreich ein Gigaset S850A GO damit. Dort sieht das dann so aus:

S850A Setup Vodafone

Categories
Communications English Networking Routers

Monitor DrayTek Vigor 130 Line Status

I recently got myself a new DSL modem, namely a DrayTek Vigor 130, as I switched from ADSL2 to VDSL2-Vectoring, so that I couldn’t use my Allnet ALL0333CJ Rev. C any longer.

As I monitor about everything (just kidding) with Nagios, I certainly wanted to implement a check of the modem’s line status.

Here’s what I came up with:

# ARG1: community
define command{
        command_name    snmp_modem_status
        command_line    /usr/lib/nagios/plugins/check_snmp -H '$HOSTADDRESS$' -C '$ARG1$' -o SNMPv2-SMI::transmission.94.1.1.3.1.6.4 -P 2c -r "53 48 4F 57 54 49 4D 45"
        }
define host {
        host_name       dslmodem
        address         192.168.0.1
        use             generic-host-internal
        parents         gw
}

Nagios is running on my intranet server. The next hop when seen from Nagios is my Internet gateway (host “gw”, my router), and from there the next hop is the DSL modem (host “dslmodem.”)

Hope this helps someone… If it does please leave a quick message here in this blog, thanks…

Categories
Communications deutsch Networking Routers Uncategorized

Vodafone VDSL-100 mit diskretem Modem und Router

Heute war endlich “der große Tag” gekommen — mein alter Arcor/Vodafone Annex.B-Anschluss (ISDN/ADSL) sollte umgestellt werden auf IP-only in Form von Vodafone VDSL-100, d. h. VDSL2-Vectoring mit einer Geschwindigkeit von 100 MBit/s für den Downlink, 40 MBit/s für den Uplink.

Bei uns kann Vodafone diesen Anschluss noch nicht basierend auf eigener Infrastruktur anbieten, sondern muss ihn als Bitstream-Produkt von der Telekom einkaufen. Das ist mir aber egal, Hauptsache es funktioniert… 😉

Aus verschiedenen Gründen mag ich keine “All-in-One”-Produkte, insbesondere keine von den Netzbetreibern angebotene:

  • Man muss bei “All-in-One”-Produkten in der Regel immer Kompromisse machen. Wenn ich “diskrete” Komponenten kaufe, d. h. ein separates Modem, einen Router, ein SIP-Gateway, einen Intranet-Server, dann kann ich mir genau die Geräte aussuchen, die meinen Vorstellungen am nächsten kommen.
  • Tritt ein Defekt bei einem “All-in-One”-Produkt auf, dann geht gar nichts mehr. Bei diskreten Geräten bleibt ein Teil der Funktionalität erhalten.
  • Ich bin nicht darauf angewiesen, dass mir der Netzbetreiber (insb. sicherheitsrelevante) Updates (zeitnah) zur Verfügung stellt, da ich mir die jeweiligen Updates jederzeit selbst beschaffen und installieren kann, insbesondere wenn ich auf Open Source-basierende Komponenten setze.
  • Andererseits kann mir der Netzbetreiber auch keine Einstellungen oder Updates “aufzwingen” und damit womöglich meinen Anschluss oder bestimmte Funktionalitäten lahm legen.
  • Netzbetreibergeräte sind oft in den Funktionen beschnitten. Bei Unitymedia z. B. muss man für die Aktivierung des WLANs extra bezahlen!

Daher setze ich folgende diskrete Geräte ein: