Categories
Android deutsch Uncategorized

Grundlagen der Android-Bedienung

Heute möchte ich einmal die Grundlagen der Android-Bedienung erläutern sowie die wichtigsten Bezeichnungen für die Bedienelemente. Ich beziehe mich hier auf ein “nacktes” Android 11, wie es von Google ausgeliefert wird, z. B. für die Pixel-Handys oder Handys von anderen Herstellern, die Teil der Android One-Reihe sind. Bei Geräten mit Android 10 sieht das aber alles sehr ähnlich aus.

Sie können diese Details auch bei Google nachlesen, dort sind diese jedoch nicht so schön illustriert wie hier.

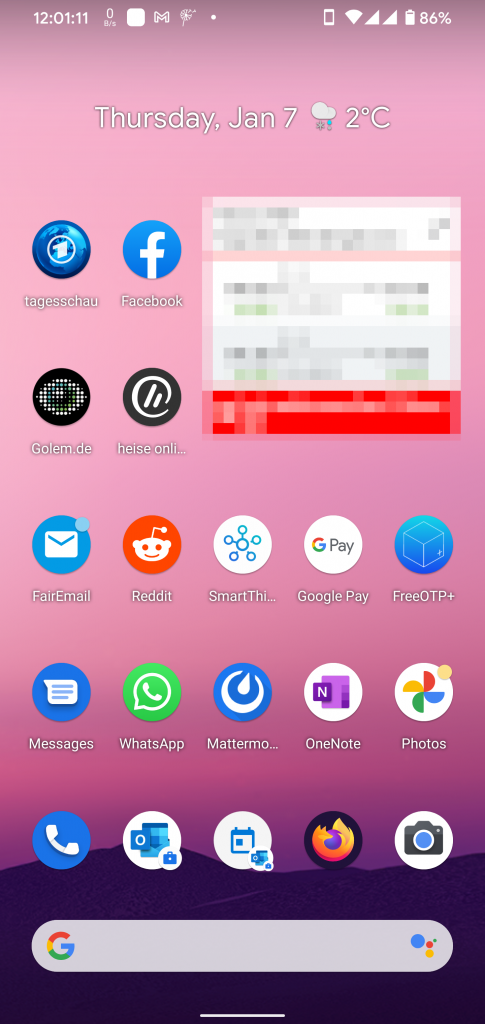
Wenn keine App geöffnet ist, dann befindet man sich auf dem Startbildschirm (“Home Screen“). Dieser sieht in etwa so aus:

Startbildschirm

Die Icons (korrekterweise “Verknüpfungen” genannt, im Englischen “Shortcut“)), die man dort sieht, hat entweder der Benutzer selbst “von Hand” hinzugefügt (s. u.), oder sie werden (je nach Einstellung) bei Installation einer neuen App vom System automatisch hinzugefügt.

Durch horizontales Wischen nach links oder rechts kann man zwischen verschiedenen Startbildschirmen — so vorhanden — umschalten.

Categories
Android English

Flashing Android Firmware Builds using Android Flash Tool

As a long-time Android user (since the days of Android 2.0, if I remember correctly), I have seen many things already, especially as I was involved in the development of mobile phones, and also fiddled a lot with CyanogenMod, LineageOS, and other custom ROMs. Still, I recently discovered something new for myself, and this is something I really find spectacular. It’s a new mechanism to flash Android firmware builds, and it’s called “Android Flash Tool” (AFT).

Let me elaborate…

Usually, to reflash a device you need to install a program on your workstation, like a vendor flashing tool, or the Android Debug Bridge (adb) command-line tool. With the Android Flash Tool, this is no longer required. The only thing you need is your WebUSB-capable (browser). 🙂 Currently, only Chrome or Edge support it. (Firefox currently doesn’t support it due to security concerns.)

Also, the number of devices which support the AFT is very, very limited. Basically, it’s just the Google Pixel series of phones, plus a few development boards.

But if you have one of those devices, it’s pretty cool.

Categories
Android Cell Phones Communications deutsch

Xiaomi Mi A2 Testbericht

Einleitung

Heute möchte ich kurz das Xiaomi Mi A2, Modell: M1804D2SG, mit 6 GB RAM und 128 GB Flash-Speicher besprechen.

Das tolle an dem Gerät ist, dass es sich um ein Android One-Gerät handelt. Das bedeutet, dass diese Handys jeden Monat regelmäßige Sicherheitsupdates erhalten und damit etwa drei Jahre versorgt werden. Das Android-Betriebssystem ist dabei (fast) ein unverbasteltes Original-Android ohne Anpassungen des Herstellers. Die wenigen Zusatz-Apps, die Xiaomi vorinstalliert hat, können bis auf eine alle gelöscht werden. Auch sehr viele der vorinstallierten Google-Apps können gelöscht werden, wenn diese nicht benötigt werden.

Beim Test war eine Oreo 8.1-Firmware mit Stand der Sicherheitsupdates vom 05.11.2018 installiert. Android Pie (9.0) wird bereits ausgeliefert, ist auf diesem Gerät jedoch leider noch nicht angekommen.

Kommunikationsfähigkeiten

Leider unterstützt das Gerät kein NFC. Für Viele ist das heutzutage für die kontaktlose Zahlung mit Google Pay sehr wichtig und ein Fehlen damit ein KO-Kriterium.

Das Gerät unterstützt Dual-4G-Standby (d. h. es kann mit zwei SIM-Karten gleichzeitig ins Netz eingebucht sein und auf SMS oder Anrufe reagieren) und eine Vielzahl von LTE-Bändern. Das (zumindest) für Vodafone-DE in ländlichen Regionen extrem wichtige, langwellige Band 20 wird unterstützt, wie ich selber überprüfen konnte. Insgesamt soll das Handy die Bänder 1, 2, 3, 4, 5, 7, 8, 20, 38, 40 unterstützen. Das wären sämtliche in Europa vorkommenden Bänder und noch einige darüber hinaus.

Telefonie über 4G/LTE ist möglich, allerdings muss dazu einmalig nach Inbetriebnahme oder Reset ein “geheimer” Code zum Abschalten des “VoLTE Carrier Check” eingegeben werden. Dieser Code *#*#86583#*#* muss in der Telefon-Anwendung als “Telefonnummer” eingegeben werden. Danach erscheint in Einstellungen > Netzwerk & Internet > Mobilfunknetz > Erweitert eine neue Option Erweiterter 4G LTE-Modus, die den VoLTE-Modus einschaltet.

Ich habe mich durch einen Testanruf davon überzeugt, dass das Handy tatsächlich nicht auf den 3G-Modus zurückfällt, sondern während des Telefonats im 4G-Modus bleibt. Damit ist bewiesen, dass das Handy tatsächlich VoLTE-fähig ist. Die Sprachqualität war kristallklar!

WiFi ist auf beiden Bändern (2,4/5 GHz) möglich. Ich habe bei 5 GHz eine Nettodurchsatzrate von 300 MBit/s erreicht (Ookla Speedtest.net), was ein sehr guter Wert ist (ich habe einen 500 MBit/s Glasfaseranschluss, kann also tatsächlich leicht diese Datenraten erreichen). Die mit dem Access Point ausgehandelte Datenrate war dabei 433 MBit/s.

Das Gerät beherrscht Bluetooth 5.0, natürlich auch Bluetooth Low Energy (BLE). Ebenso beherrscht es GPS, Glonass (das russische Pendant) und BeiDou (das chinesische Satelliten-Navigationssystem).

Verschiedenes

Die Akkulaufzeit ist nur als “hervorragend” zu bezeichnen: Gut vier Tage hat das Handy durchgehalten. Dabei waren zwei SIM-Karten eingesetzt, das Handy war also mit beiden Mobilfunkmodulen ständig im Standby-Betrieb. In der Zeit habe ich das Handy eingerichtet (Einstellungen-Menü komplett durchgeschaut und viele Änderungen vorgenommen, Apps installiert und diese getestet), weil ich es gerade erst (für meinen Vater) neu erworben habe. Außerdem habe ich sehr viel Facebook und Nachrichten gelesen.

Das tolle, große Display von sechs Zoll Größe macht einen hervorragenden Eindruck und ist sehr klar abzulesen. Mit seinem Qualcomm Snapdragon 660-Chipsatz gehört das Handy zu den derzeit schnellsten Handys.

Die Verarbeitung des Handys ist tadellos, das Gerät macht einen durchaus edlen Eindruck. Sehr positiv finde ich, dass es keinen Glasrücken hat, da ein solcher bei Stürzen erfahrungsgemäß sofort zerspringt.

Was ich ebenfalls sehr positiv fand ist, dass eine Silikon-/TPU-Hülle mitgeliefert wird. Diese ist relativ dünn, bietet also wohl wenig Schutz gegen Stürze oder harte Schläge, ist aber allemale gut geeignet um Kratzer vom Gerät fernzuhalten.

Fazit

Für einen Preis von bereits um die 230 EUR erhält man ein hervorragend ausgestattetes Handy der Oberklasse, dem lediglich NFC fehlt. Für diejenigen, die damit leben können, kann ich nur eine absolute Kaufempfehlung aussprechen. Vielleicht für den einen oder anderen ein schönes Weihnachtsgeschenk? 😉
Categories
Android English Uncategorized

Huawei P8 (GRA-L09) modding

This post about “modding” of a Huawei P8 aims to summarize most of the standard procedures you need when you want to modify the device software (also called “firmware”), because you are a developer or want to be more flexible in how you use your device.

Normally, in order to gain this knowledge, you have to read a lot of “geeky” posts on sites like xda developers, which is very time consuming, and sometimes even leads to complete failure (you end up “bricking” your device), because many people there don’t bother to post clear and comprehensive instructions, but simply assume people have some pre-knowledge and know how to do things.

I don’t yet consider this post “finalized” yet (it needs some “polishing”), but I would like to make it available already now to make sure it won’t be forgotten… 😉

Fastboot Mode

“Fastboot” mode is a special mode your device can be put into in order to perform certain maintenance operations, such as (un-) locking your boot loader, flashing partition images, etc. The tool you use on your PC or Mac to communicate with the phone while it is in “fastboot” mode is also called fastboot. It is part of the Android platform tools which you can download here directly from Google.

Categories
Android Cell Phones English Uncategorized

Sony Xperia X Compact Modding

I decided to write this post since I couldn’t find any single page that lists all the “secrets” you need to know when modding your Sony Xperia X Compact (XC) codenamed “Kugo” in a concise manner and in a single place. And after half a year when I last tinkered with my XC, I had forgotten about all the details again, so I had to research them again anyway…

I give credit to the following XDA people (but not limited to them, I apologize to those who I might have forgotten):

General Approach

The general approach when modding your phone is the following:

  1. Flash custom recovery
  2. Backup current installation/data
  3. (Optionally: flash latest stock firmware)
  4. (Optionally: flash custom recovery that works with your new stock firmware)
  5. Root
  6. Flash other mods or use “root” apps

Custom Recovery

Fastboot Mode

First let’s explain what “fastboot mode” is: Fastboot is both a tool and a protocol for writing data directly to your phone’s flash memory. In practical use, it is used to flash images such as recoveries, bootloaders, and kernels to your Android device.

The “fastboot” tool (as well as “adb” which is also needed when tinkering with your Android smart phone) is part of the Android “platform tools,” which you can download directly from Google (roughly 4M only).

To bring your phone into fastboot mode, perform the following steps:

  1. Switch the phone off.
  2. Hold “Volume up” and connect your phone to the USB port of your PC. The notification LED should first light up in red, then blue, and provided you have correctly installed drivers, you will be able to use fastboot commands.
    Note that the screen will remain black. You can check whether you are in fastboot mode with the following command:

    $ fastboot devices
    BH901XXXXX    fastboot

    If you see output similar to the above, you have successfully put your phone in fastboot mode.