Category Archives: Communications

Sony Xperia X Compact Modding

I decided to write this post since I couldn’t find any single page that lists all the “secrets” you need to know when modding your Sony Xperia X Compact (XC) codenamed “Kugo” in a concise manner and in a single place. And after half a year when I last tinkered with my XC, I had forgotten about all the details again, so I had to research them again anyway…

I give credit to the following XDA people (but not limited to them, I apologize to those who I might have forgotten):

General Approach

The general approach when modding your phone is the following:

  1. Flash custom recovery
  2. Backup current installation/data
  3. (Optionally: flash latest stock firmware)
  4. (Optionally: flash custom recovery that works with your new stock firmware)
  5. Root
  6. Flash other mods or use “root” apps

Custom Recovery

Fastboot Mode

First let’s explain what “fastboot mode” is: Fastboot is both a tool and a protocol for writing data directly to your phone’s flash memory. In practical use, it is used to flash images such as recoveries, bootloaders, and kernels to your Android device.

The “fastboot” tool (as well as “adb” which is also needed when tinkering with your Android smart phone) is part of the Android “platform tools,” which you can download directly from Google (roughly 4M only).

To bring your phone into fastboot mode, perform the following steps:

  1. Switch the phone off.
  2. Hold “Volume up” and connect your phone to the USB port of your PC. The notification LED should first light up in red, then blue, and provided you have correctly installed drivers, you will be able to use fastboot commands.
    Note that the screen will remain black. You can check whether you are in fastboot mode with the following command:

    $ fastboot devices
    BH901XXXXX    fastboot

    If you see output similar to the above, you have successfully put your phone in fastboot mode.

Continue reading Sony Xperia X Compact Modding

Jabra Speak 510 Kurztest

Heute möchte ich ganz kurz das Jabra Speak 510 besprechen.

Überblick

Bei dem Jabra Speak 510 handelt es sich um ein Konferenzmikrofon bzw. einen Konferenzlautsprecher, welcher per USB oder Bluetooth mit Laptops oder Handys gekoppelt werden kann, um dann “freihändig” Telefonate bzw. Videokonferenzen führen zu können.

Das Gerät besitzt ein zylinderförmiges Gehäuse, von der Grundfläche etwas größer als ein Bierdeckel würde ich sagen, Höhe etwa fünf Zentimeter. Das Gewicht beträgt ziemlich genau 200 g. Im Lieferumfang enthalten ist eine Neoprenhülle, mit der das Gerät geschützt vor Kratzern transportiert werden kann. Auch vor Beschädigung durch Stürze schützt es scheinbar recht gut. Mir ist es aus ca. 1 m herunter gefallen, und es funktioniert nach wie vor ohne Probleme.

Jabra Speak 510
Jabra Speak 510

Vorteile gegenüber Headsets

Ich habe mir dieses Konferenzmikro vor einigen Monaten gekauft, weil ich täglich oft mehrere Stunden in Telefonkonferenzen oder Videokonferenzen per Microsoft Skype for Business zubringe. Mein Plantronics-Headset ist nach einigen Stunden, obwohl es grundsätzlich sehr bequem zu tragen ist, dann einfach nur noch eine Plage.
Continue reading Jabra Speak 510 Kurztest

Monitoring Microsoft SNDS Status

If you operate a mail server, you should be aware of its “reputation,” because a bad reputation can give you issues sending email to certain recipients.

Microsoft operate a set of services called “Smart Network Data Services (SNDS)” to protect their own email services. If they see spam or other “malicious” activity from your address space, they might put you on a blacklist, and based on that reject email from you. It is easy to register yourself so that you can query the status of your IP address space. Just visit the above site and get started.

I created a quick’n’dirty monitoring script for Nagios to monitor the status of my IP address space in SNDS. Whenever there is data for one of my IP addresses, this script will return a WARNING status, so that I can look into it.

The script looks like follows:

#!/bin/bash

URL='https://postmaster.live.com/snds/ipStatus.aspx?key=12345678-1234-1234-1234-0123456789ab'

content="$(curl -s $URL)"
size=${#content}

if [ $size -gt 0 ]; then
    echo "WARNING:SNDS status seems to be UNHEALTHY"
    exit 1
fi

echo "OK:SNDS status is OK"
exit 0

You also need command and service definitions in Nagios as follows:

define command{
        command_name    check_snds
        command_line    /usr/local/lib/nagios/plugins/check_snds
}

define service {
        host_name                       my_host
        service_description             SNDS
        check_command                   check_snds
        use                             generic-service-internal
        notification_interval           0 ; set > 0 if you want to be renotified
}

Now, Nagios will monitor the “reputation” of your address space for you.

WLAN-Probleme erkennen und beseitigen

Aus aktuellem Anlass schreibe ich hier einmal etwas zu gängigen WLAN/WiFi-Problemen — wie erkenne ich sie, und wie beseitige ich sie.

(Der aktuelle Anlass ist, dass hier bei uns im Ort endlich die lang ersehnten Aktivierungen unserer Glasfaser/FTTH-Anschlüsse von “Deutsche Glasfaser” erfolgt sind. Daher häufen sich diese Fragen bei mir und anderen Mitgliedern unserer Bürgerinitiative.)

Zunächst einmal ein bisschen Grundlagenwissen, (hoffentlich) so erklärt dass es auch Menschen verstehen können, die nicht Elektrotechnik studiert haben. 😉

WLAN ist ein “shared medium”, ein “geteiltes (Übertragungs-) Medium”, d. h. die maximal erreichbare Geschwindigkeit wird zwischen allen Teilnehmern eines WLANs aufgeteilt. Führt also gerade eine Station im Netz einen großen Download mit hoher Geschwindigkeit durch, dann werden die anderen Stationen im Netz entsprechend ausgebremst.

WLAN kann auf zwei Frequenz”bändern” stattfinden, dem “alten” 2,4 GHz-Band und dem (relativ) neuen 5 GHz-Band. Client (also Laptop, Handy…) und Router (Access Point) müssen jeweils beide das 5 GHz-Band beherrschen, damit dieses benutzt werden kann (Stichworte sind 802.11a oder 802.11ac, bei 802.11n kann es sich sowohl um 2,4 als auch 5 GHz handeln). Als “Access Point” bezeichnet man das WLAN-Radio in einem Router, es gibt auch separate Access Points, die nur der Koppelung von drahtlosen Stationen an ein drahtgebundenes LAN dienen.

Auf Grund seiner hohen Frequenzen ist das 5 GHz-Band “kurzwelliger”, dadurch ist seine Reichweite gegenüber dem 2,4 GHz-Band begrenzt (es durchdringt nicht so leicht Decken und Wände), was durchaus gewisse Vorteile hat, doch dazu später.

Die gesamten 2,4 bzw. 5 GHz-Bänder werden in so genannte “Kanäle” aufgeteilt, damit sich mehrere Betreiber eines WLANs nicht “ins Gehege kommen” und jeweils einen eigenen Kanal zum Übertragen haben. In eng besiedelten Gegenden, z. B. in Innenstadtbereichen, aber auch durchaus hier bei uns im Neubaugebiet, kommt es oft vor, dass sich Kanäle überlappen. Dies ist unbedingt zu vermeiden, weil dies die Übertragungsrate für alle(!) beteiligten WLANs reduziert.

Um festzustellen, ob diese Situation bei sich selbst vorliegt, sollte man ein Tool wie den kostenlosen WiFiAnalyzer benutzen. Im Bereich “Channel Graph” kann man dann einen Graphen wie den Folgenden sehen:screenshot_20170105-213839-576x1024
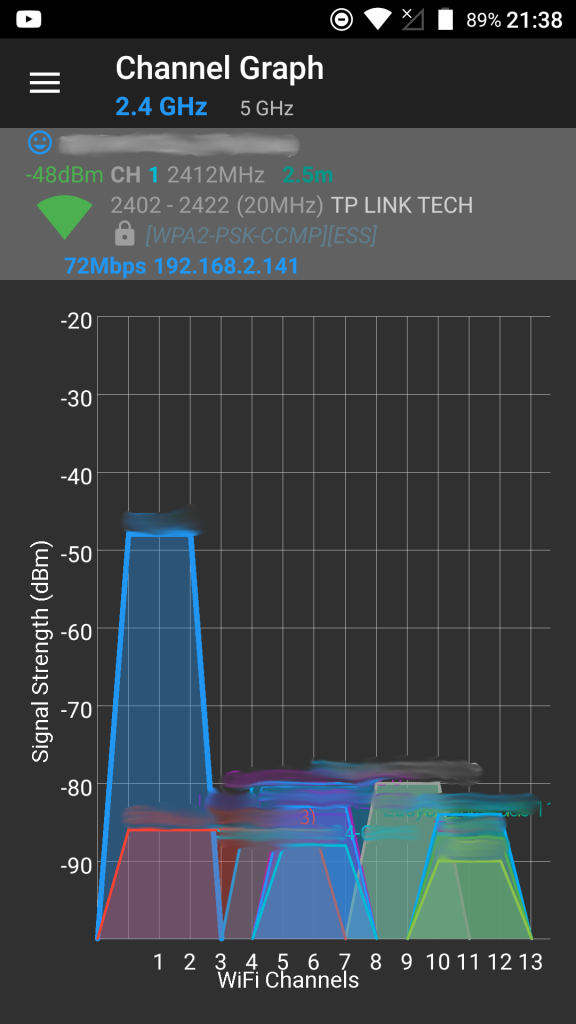
Was sagt uns jetzt dieser Graph? Zum einen sehen wir oben in blau, dass hier das 2,4 GHz-Band betrachtet wird (man kann dort auch auf das 5 GHz-Band umschalten, um dieses zu betrachten). Unten sieht man die Kanäle im 2,4 GHz-Band, in Deutschland sind 1-13 erlaubt.

(An dieser Stelle die dringende Warnung, keine verbotenen Kanäle zu benutzen. Dies kann Störungen verursachen. Der Verursacher haftet für alle entstehenden Kosten, das kann schnell in die Tausende Euro gehen, plus eine empfindliche Geldbuße nach sich ziehen!)

Die einzelnen farbigen, mehr oder weniger “hohen” Buckel sind die Frequenzbänder, die die einzelnen WLANs belegen. Wie bereits gesagt sollten sich diese idealerweise nicht überlappen. Die “Höhe” der Buckel zeigen die Signalstärke an. Je höher der Buckel, desto stärker das Signal. Wenn das eigene WLAN von einem oder mehreren fremden WLAN(s) überlappt wird, dann ist der Einfluss umso geringer, je schwächer das oder die fremde(n) WLAN(s) ist/sind.

Idealerweise spricht man sich als Nachbarn gegenseitig ab, wer welchen Kanal belegt, damit eben nicht solche Überlappungen zu Stande kommen. Der Bereich “Access Points” in der oben empfohlenen Android-App ist hier sehr hilfreich. Wenn man sich auf der eigenen Straße bewegt, kann man an der Signalstärke relativ schnell erkennen, wo welches WLAN “zu Hause ist”.

Ein Access Point benutzt zu jedem Zeitpunkt nur einen bestimmten Kanal (bzw. mehrere Kanäle gebündelt, um den Durchsatz zu erhöhen). Viele Access Points sind ab Werk so eingestellt, dass sie sich automatisch den “besten” Kanal suchen. Ich persönlich rate dazu, den eigenen Access Point fest auf einen bestimmten Kanal einzustellen und diesen mit den Nachbarn zu koordinieren, um besagte Überlappung zu verhindern.

Eine weitere Einstellung sollte auch nach Möglichkeit modifiziert werden. Viele Access Points erlauben die Einstellung der Sendeleistung. Diese sollte möglichst konservativ gewählt werden derart, dass der Access Point die eigenen Geräte gerade noch gut erreicht, jedoch nicht viel weiter sendet. Sonst kommt eben die erwähnte Überlappung zu Stande, die man gerne vermeiden möchte. Access Points, die so eine Überlappung feststellen, können dann durchaus ihre Sendeleistung (in vorgegebenem Rahmen) erhöhen, um den anderen zu “übertönen”. Dies geschieht, damit wieder ein gewisser “Signal-Rauschabstand” gewährleistet ist, um das (eigene) Signal vom “Rauschen” (dem Fremdsignal) sauber trennen zu können.

Um Überlappungen zu reduzieren oder zu vermeiden kann man auch die Kanalbreite reduzieren. In dem obigen Screenshot sieht man hauptsächlich WLANs, die eine Kanalbreite von 20 MHz benutzen. Wie bereits kurz erwähnt kann man die Kanalbreite erhöhen, um einen größeren Durchsatz zu erzielen. Das rote WLAN im obigen Diagramm benutzt eine Kanalbreite von 40 MHz. Dadurch kommen entsprechend viele Überlappungen zu Stande.

Reduziert man die Kanalbreite, so vermeidet man ggf. eine Überlappung vollständig oder reduziert zumindest die Anzahl der überlappenden Netze. Obwohl dadurch die (unter Idealbedingungen) maximal erzielbare Kanalbreite reduziert wird, wird man wahrscheinlich in der Praxis feststellen, dass der Betrieb nun wesentlich stabiler ist und die Transferraten womöglich höher sind als vorher!

Alternativ, und das ist meine dringendste Empfehlung, kann man auf das 5 GHz-Band ausweichen. Wenn alle eigenen Geräte dieses unterstützen, dann empfehle ich, das 2.4 GHz-Band komplett abzuschalten. Dies kommt auch einem Bluetooth-Betrieb zu Gute, der auf einem ähnlichen Frequenzbereich stattfindet. Das 5 GHz-Band bietet deutlich höhere Transferraten und den zusätzlichen Vorteil, dass es nicht so “überlaufen” ist wie das 2,4 GHz-Band. Dies ist zum einen der geringeren Verbreitung geschuldet, zum anderen aber auch der deutlich geringeren Durchdringung und damit Reichweite der 5 GHz-Wellen.

Hier noch einmal ein Screenshot von meiner eigenen Situation, diesmal im 5 GHz-Band:

screenshot_20170105-223020Man sieht, dass bei mir überhaupt nur zwei Netze im 5 GHz-Band sichtbar sind. Mein eigenes (welches man an Hand der Signalstärke sehr einfach identifizieren kann) und ein fremdes. Der Signal-Rauschabstand zwischen diesen beiden Netzen ist jedoch so groß, dass das Fremdnetz quasi nicht stört. Ich erreiche hier Transferraten von mehr als 200 MBit/s in beide Richtungen (beim Senden und beim Empfangen) mit Stationen, die das unterstützen.

So, das soll es gewesen sein. Ich hoffe, dieser Blog-Post nutzt dem einen oder dem anderen. Ich würde mich in diesem Fall über einen Kommentar hier in meinem Blog sehr freuen. Fragen werde ich gerne beantworten. Sollte ich etwas vergessen haben, werde ich den Post noch entsprechend ergänzen.

Viel Erfolg beim Optimieren Eurer WLANs!

DrayTek Vigor130: Warnung vor “ALL”-Firmware

Aus eigener Erfahrung kann ich nur dringend vor der Installation der “ALL”-Firmware-Varianten beim DrayTek Vigor130 warnen, insbesondere wenn zwischen der installierten Version und der zu installierenden Version einige Builds liegen.

Die “ALL”-Variante behält die aktuellen Einstellungen bei, die “RST”-Variante setzt das Modem/den Router auf die Werkseinstellungen zurück. Das klingt schlimmer als es ist, denn wenn man vorher die Einstellungen über das Web-Interface herunter lädt/sichert, kann man diese nach erfolgreichem Upgrade wieder hoch laden/restaurieren.

Wie auch immer, ich hatte Version 3.7.8.3_m7 installiert und wollte auf 3.7.9.3_m7 upgraden, und zwar unter Verwendung der “ALL”-Variante. Beim Upgrade ist nichts schief gelaufen (jedenfalls nicht offensichtlich), trotzdem erhielt ich hinterher folgende Popup-Warnung im Browser:

screen-shot-2016-11-10-at-09-02-12Ich versuchte dann die selbe Firmwareversion erneut zu installieren, aber die Fehlermeldung erschien wieder. Außerdem wurde unten in der linken “Menüleiste” folgende Meldung angezeigt:

screen-shot-2016-11-10-at-10-54-23Ich versuchte also, die “RST”-(Reset)-Variante zu flashen — mit dem selben (Miss-) Erfolg. 🙁

Bei einem Telefonat mit der wie immer sehr freundlichen und kompetenten DrayTek-Hotline wurde mir dann empfohlen, die TFTP-Notfall-Wiederherstellung zu nutzen, was ich dann auch tat.

Dazu muss man zunächst das Modem direkt per Netzwerkkabel mit einem Windows-PC/Laptop verbinden, welchen man manuell/statisch auf die IP-Adresse 192.168.1.2 setzt. Dann das Modem ausschalten,  den Resetknopf an der Rückseite mit einem Kuli gedrückt halten, und dann das Modem wieder einschalten. Den Resetknopf für ca. fünf Sekunden gedrückt halten, dann startet der TFTP-Server im Modem.

Nun mit dem Firmware-Update-Tool, welches man bei DrayTek herunter laden kann, die Firmwaredatei an das Modem (unter der default-Adresse 192.168.1.1) schicken. Das ganze sollte übrigens auch mit einem Linux- oder macOS-Rechner funktionieren, es reicht ein normaler TFTP-Client.

Fertig!

Nach dem Reboot dann noch über das Webinterface die Konfiguration wieder restaurieren, und alles ist wieder gut.

Der ganze Vorgang hat insgesamt nur etwa zehn Minuten gedauert.

Update U-Boot on TP-Link TL-WDR4300

A couple of days ago while I was working from home my trusted TP-Link TL-WDR4300 seemed to have died suddenly (just a couple of days after the two year warranty had expired!) — at least this was the result of my initial investigations.

The symptom I had is that suddenly my internet connection seemed to be down — which was surprising enough, as since I upgraded to VDSL2 vectoring my line was rock-solid, and it normally dropped only once a month or even once every couple of months. When I tried to find out what happened I noticed that my router was inaccessible, I couldn’t even ping it. I thought it had crashed, so I power-cycled it to reboot it, but it didn’t come up…

So my conclusion was that it had died.

I quickly reconfigured a Linksys WRT1200AC which I bought a couple of months ago as a spare device, meant to replace the current router “one day”, and put it into operation…

Today I spent some time investigating what actually happened. I wanted to use the serial console of my rev. 1.7 device (the PCB is rev. 1.3), but found that there was no connector in place for the UART, just the holes in the PCB.

dav

So I quickly soldered in the pins, and connected the router to a laptop.

sdr

To my surprise the router booted without any issue at all. I played around with it until I was sure that there was absolutely no problem — I thought the file system in the flash memory might have been corrupted, but everything was ok.

So now that I had opened the device and connected a laptop to the serial console, I thought it would be a good occasion to update the U-Boot boot loader to a modified one by “pepe2k” that adds a lot of very useful features.

I used the instructions pepe2k provided on Github, specifically the part where he describes how to install via TFTP from the serial console. The “biggest challenge” was to find where to download the actual boot loader binary. Finally I found it here.

My VerizonWireless prepay experience

We just returned from a one month vacation trip to Florida. In order to be able to use the internet when on the go, and also to be able to make and receive phone calls we decided to use a prepay card from VerizonWireless (VZW), as they seem to have the best 4G (LTE) coverage. The SIM is normally $45 for a month, including unlimited texts and calls and 1 GB of data, but we got it from Walmart for about $37, plus we received a free one-time bonus of 1 GB data when we activated the SIM via phone.

Our customer experience was pretty bad, and I want to share with you what kind of problems we had so that you can avoid those if possible.

The phone I intended to use was an iPhone 6 Plus. This cell phone is among the cell phones that have the most LTE bands available in the world, and I explicitly checked to make sure that VZW’s bands are covered. But when I tried to use the phone it couldn’t attach to the network. I got in touch with VZW, and it turned out that they only let phones use their network (with their own VZW prepay SIMs, that is!) that have been sold by or for VZW. But after talking to them for a while and letting them know about my disappointment (because in Europe this doesn’t seem to be common) they agreed to make an exception and have my iPhone authorized to use the network.

Even after four days (they said it should take 48 hours max), more than 3.5 hours talking to or chatting with their support, and even changing the SIM in a nearby VZW store, my iPhone still didn’t work, so I looked into other options. It turned out that you can buy simply 4G cell phones here real dirt cheap, so I bought a Motorola Moto E (2nd Gen) for less than $50. This phone immediately worked with the SIM I had.

I logged onto their MyVerizon prepay Desktop Home page to check and update some settings. This portal was another really bad experience, something which you really cannot ask your customers to use. The issues I encountered were the following:

  • After I had entered my address here in Florida (we lived in the house of relatives), there was trailing characters in the street address which I didn’t enter, and which I could not remove by any means.
  • Furthermore I couldn’t change my device from the original iPhone 6 Plus to the new Motorola Moto E — all changes (including IMEI which was verified to be “valid” and “known” to VZW) seemed to the accepted, and change of device was confirmed, but when I went into the main menu and back to “Device” the iPhone was still listed.
  • In addition I couldn’t change my Voice Mail PIN, probably the reason why voice mail was not available for my SIM during the whole month of our stay.

As an alternative to the bad web portal I installed the “My Verizon Mobile” Android app, but that was disappointing, too. There was absolutely no way to tell the app not to ask for the password again — a bad thing as I normally use “strong” passwords which I cannot easily remember, so how to use the app when on the go?! More issues encountered were

  • “Usage” details permanently give me “An error occurred while processing your request;”
  • in “My Features” I couldn’t activate the “Block Premium Messaging” option (even though changing the switch produced a confirmation that said the change was successful); every time I return to this menu item the setting is back to allow premium messaging;
  • in “Settings” > “Contact Info” I couldn’t make any changes, as the app declared my email address invalid (as it contains a “+” in the so-called “local-part,” which is the part left of the “@”). That was of course nonsense, as RFC-2822 allows such email addresses, I constantly receive mail on such addresses and VZW’s web portal allowed it as “valid;”
  • changing my Voice Mail Password (PIN) was also impossible in the Android app. I always got an error message saying “We are sorry, but we are not able to process your request at this time. Please try again later.”

What I must admit, though, their staff were always very friendly and tried to help — but what can you do if your IT systems let you down?!

The main reason I write this blog post is to let people from Europe know about the limitations they might encounter when trying to use their own phone with a local prepay SIM. But I also want to let VZW know my frustration with their bad self-service tools. This is not how you treat your valuable customers!!!

Hacking the Genexis FiberTwist-P2410

In my previous article I described the key components the Genexis FiberTwist-P2410 is comprised of. One of these components is the serial console connector, and its presence was so tempting that I simply had to play with it…

Layout of Serial Console Connector

So I connected a UART-to-USB converter and watched the console output while the device boots… Communications parameters were easy to guess: 115,200 bps, 8N1, no handshake (neither HW, nor SW)… Continue reading Hacking the Genexis FiberTwist-P2410

uhttpd with a certificate chain

To secure access to my router I wanted to use SSL encryption to access LuCi, so I obtained a certificate issued by a well-known CA. The server certificate was not issued directly off the CA, but there was a certificate chain in between.

Using a certificate chain with OpenWrt’s uhttpd is really easy, although as of today this is not yet even documented to be possible on the OpenWrt web site.

I’m using uhttpd_2015-11-08 from a trunk build (r48648) of “Designated Driver”, and certificate chains can be used here without problems.

I didn’t even have to convert from PEM to DER, I just concatenated the server cert and intermediate certs into a single file:

cat /root/server.crt /root/1_root_bundle_1.crt /root/1_root_bundle_2.crt >uhttpd.crt

Hope this helps. If it does please leave a message, thank you.